Unleash your inner artist with 10 unique painting ideas on canvas. Discover step-by-step techniques, essential materials, and expert tips for beginners.
painting ideas on canvas, easy canvas painting, acrylic painting for beginners, abstract canvas art, DIY canvas painting, creative painting techniques.
Have you ever stared at a blank, crisp white canvas and felt a wave of creative paralysis? You have a burning desire to create something beautiful with your hands, buy a fresh set of paints, and clear off your kitchen table—only to find your mind going completely blank the moment a paintbrush is in your hand.
The fear of ruining a perfectly good canvas is incredibly common. Many aspiring artists and weekend crafters look at professional gallery pieces or complex social media tutorials and think, “I could never do that.” They worry about complicated color mixing, perspective, or a lack of formal fine arts training. As a result, those pristine canvases end up stacked in a closet, collecting dust rather than bringing color to your walls.
The secret to breaking through this creative block is to realize that you do not need to be a master painter to create stunning, professional-looking art. By focusing on accessible, structured, and modern painting ideas on canvas, you can bypass the frustration and head straight to the therapeutic, joyful part of creating. Whether you are looking to design your own home decor, craft a personalized gift, or simply enjoy a relaxing weekend afternoon, this comprehensive guide offers 10 foolproof canvas painting projects designed for all skill levels.
Why Canvas Painting is the Perfect Creative Escape
Engaging with a canvas offers a uniquely satisfying tactile experience that digital screens simply cannot replicate. The smooth drag of a brush loaded with rich pigment, the blending of hues right before your eyes, and the physical texture built layer by layer make canvas painting an incredible form of stress relief. It acts as an active meditation, shifting your focus away from daily anxieties and channeling your energy into shapes and colors.
To help you match your current energy, available time, and stylistic preferences with the perfect project, we have structured an overview of our top 10 canvas art concepts below.
Canvas Art Concepts: Quick Project Comparison
| Painting Concept | Estimated Time | Technical Difficulty | Textural Style | Best For |
|---|---|---|---|---|
| 1. High-Texture Abstract | 45–60 mins | Very Low | High Heavy-Body | Modern minimalist homes |
| 2. Geometric Color Block | 30–45 mins | Low | Flat Matte | Bold accent walls |
| 3. Fluid Acrylic Pouring | 20 mins (plus dry) | Medium | Ultra-Glossy Smooth | Vibrant, unpredictable art |
| 4. Starry Night Galaxy | 60 mins | Medium | Blended Layered | Dreamers & celestial fans |
| 5. Minimalist Botanical | 30 mins | Low | Delicate Fine-Line | Boho-chic spaces |
| 6. Birch Tree Forest | 45 mins | Medium | Mixed Palette-Knife | Nature & rustic decor lovers |
| 7. Watercolor-Style Acrylic | 40 mins | Low | Translucent Washed | Soft, serene rooms |
| 8. Ombre Sunset Silhouette | 45 mins | Low | Softly Graded | Vibrant color enthusiasts |
| 9. Palette Knife Floral Palette | 60 mins | Medium | Impasto 3D Sculpted | Romantic, classical touches |
| 10. Splatter Art Expressionism | 15 mins | Very Low | Dynamic Layered | Energetic, playful spaces |
10 Inspiring Canvas Painting Ideas to Try Today
Here is our deeply detailed, curated selection of the absolute best canvas painting projects. Each concept breaks down exactly what the style is, who it suits best, professional application tips, and the distinct aesthetic benefits of adding it to your portfolio.
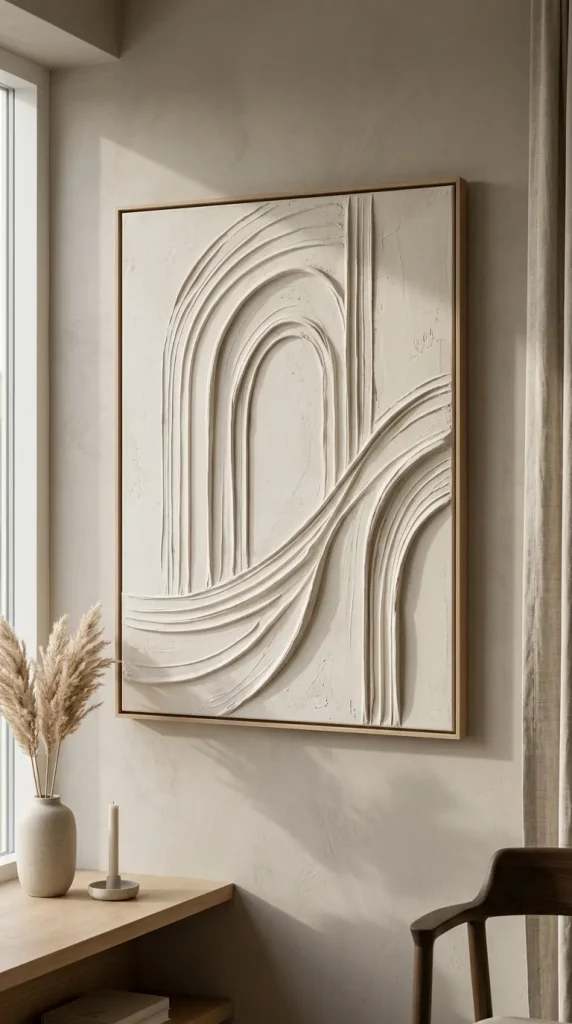
1. High-Texture Minimalist Abstract Art
This style prioritizes physical depth over complex imagery. By mixing modeling paste or joint compound directly with acrylic paint—or applying the paste first and painting over it—you create heavy, three-dimensional ridges, waves, or arches that catch the light in beautiful ways throughout the day.
- Who It Suits Best: Lovers of sleek interior design, Scandinavian decor, and beginners who want to create high-impact, gallery-style art without worrying about drawing shapes.
- Application & Execution Tips: Use a notched trowel, an old credit card, or a plastic cake scraper to carve clean lines into the wet paste. Keep your color palette highly restricted to a maximum of two or three neutral colors, such as warm cream, charcoal, and a touch of metallic gold leaf.
- Benefits: It delivers a highly luxurious, architectural look that instantly elevates large empty wall spaces, making your home look like it features expensive custom commissions.
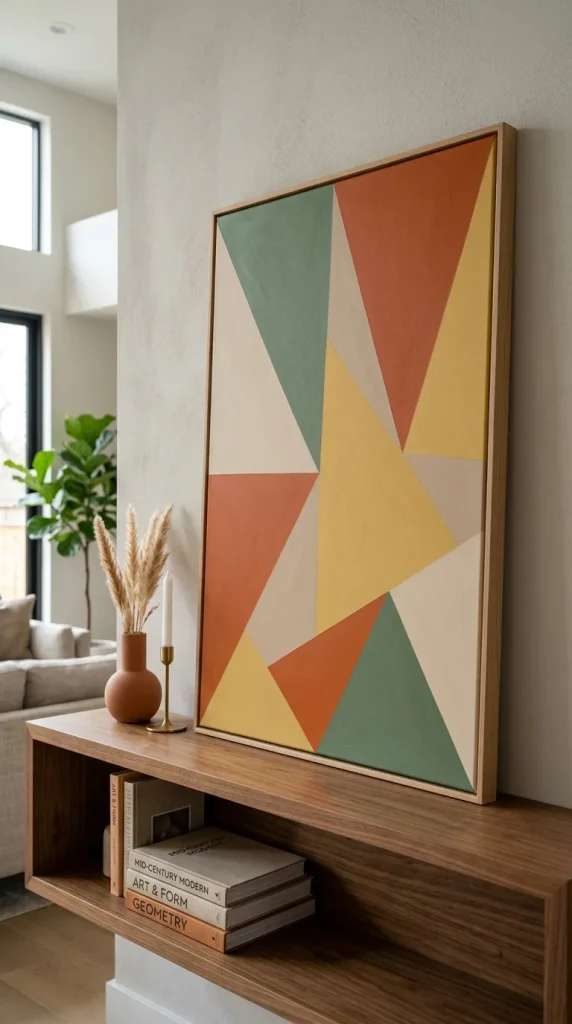
2. Precision Geometric Color Blocking
This method relies on sharp lines, contrasting shapes, and crisp clean fields of color. By mapping out a grid, overlapping triangles, or retro mid-century curves with painter’s tape, you turn your canvas into a clean graphic design masterpiece.
- Who It Suits Best: Perfectionists, lovers of mid-century modern design, and anyone who feels comforted by clean symmetry and straight lines.
- Application & Execution Tips: Lay down your blue painter’s tape firmly and seal the edges by running your thumbnail over them. Pro tip: Paint over the tape edge with your background color first; this seals the tape completely so your accent colors cannot bleed underneath. Peel the tape away slowly while the paint is still slightly damp.
- Benefits: It guarantees crisp, mathematically perfect results with zero freehand drawing skills required, giving you absolute control over the final look.
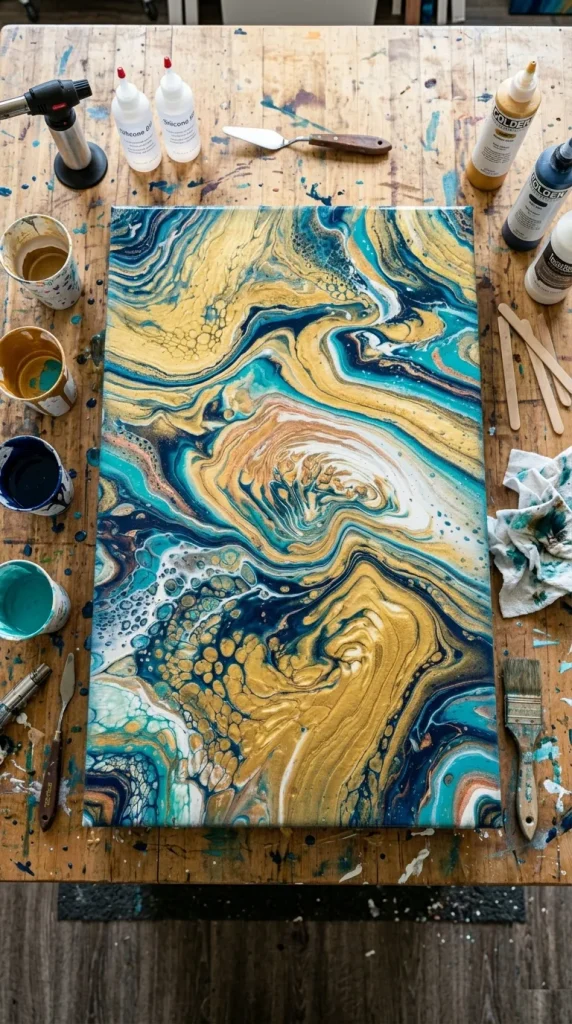
3. Fluid Acrylic Pour Art
Acrylic pouring is an exhilarating, abstract fluid art technique where liquid paints are mixed with a pouring medium and flipped, tilted, or blown across the canvas. The colors slide over one another to create hypnotic, organic cells and marbling effects.
- Who It Suits Best: Experimental minds, color enthusiasts, and anyone looking for a high-energy, delightfully unpredictable process.
- Application & Execution Tips: Mix your acrylic paints with a dedicated pouring medium (like Floetrol) to achieve the consistency of warm honey. Add a single drop of silicone oil to each color cup before pouring to induce the formation of large, striking circular “cells” as the paint spreads.
- Benefits: No two poured canvases are ever identical. It is a liberating art form where you relinquish absolute control and let fluid physics create natural, mesmerizing patterns.
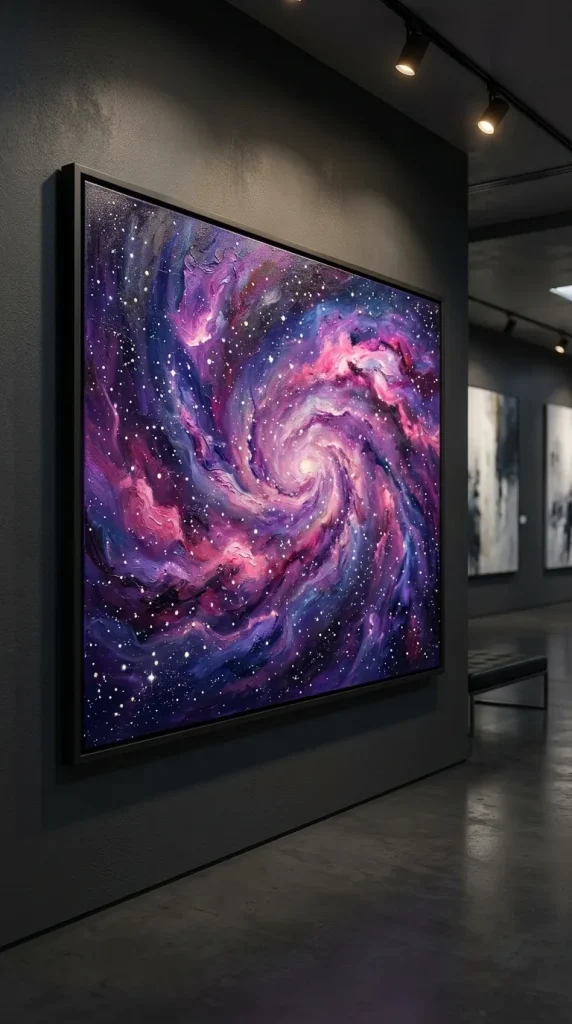
4. Celestial Starry Night Galaxy Scene
A magical, deep-space visual created by layering deep blacks, indigos, purples, and hot pinks using a dabbing sponge motion. The scene comes alive when you flick thinned white paint across the canvas to form thousands of shimmering distant stars.
- Who It Suits Best: Dreamers, stargazers, and intermediate painters looking to practice their blending, shading, and atmospheric depth work.
- Application & Execution Tips: Work from light to dark. Sponge on your bright pinks and magentas first, then frame them with rich dark purples and blacks around the canvas edges. Use a stiff-bristled toothbrush dipped in watery white acrylic paint to flick your stars on at the very end.
- Benefits: It teaches beautiful blending transitions and produces a moody, luminous piece of art that adds depth and cosmic wonder to a bedroom or office.
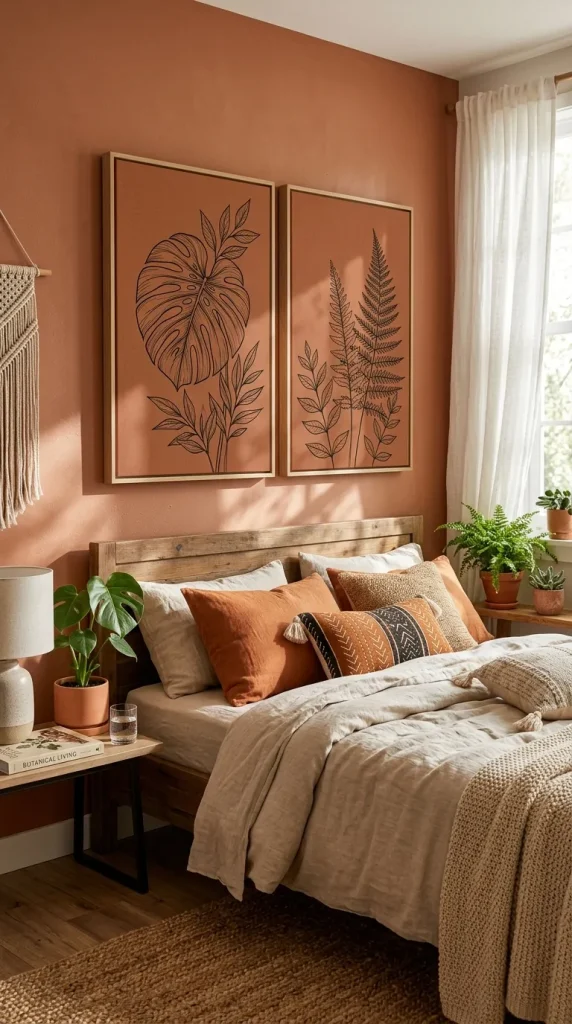
5. Minimalist Fine-Line Botanical Art
This elegant concept features simple, continuous silhouettes of Monstera leaves, eucalyptus sprigs, or simple wild ferns painted against a soft, earthy, monochromatic background. It emphasizes negative space and delicate linework.
- Who It Suits Best: Fans of organic boho style, indoor plant collectors, and those who prefer quiet, calming bedroom decor.
- Application & Execution Tips: Paint your entire canvas in a matte neutral shade like terracotta, sage green, or soft beige. Once dry, use a long, thin script liner brush (or even a high-quality acrylic paint pen) to trace your botanical outlines with slow, steady pressure.
- Benefits: It requires very little paint, works beautifully in sets of two or three companion canvases, and creates an incredibly tranquil, grounded ambiance.
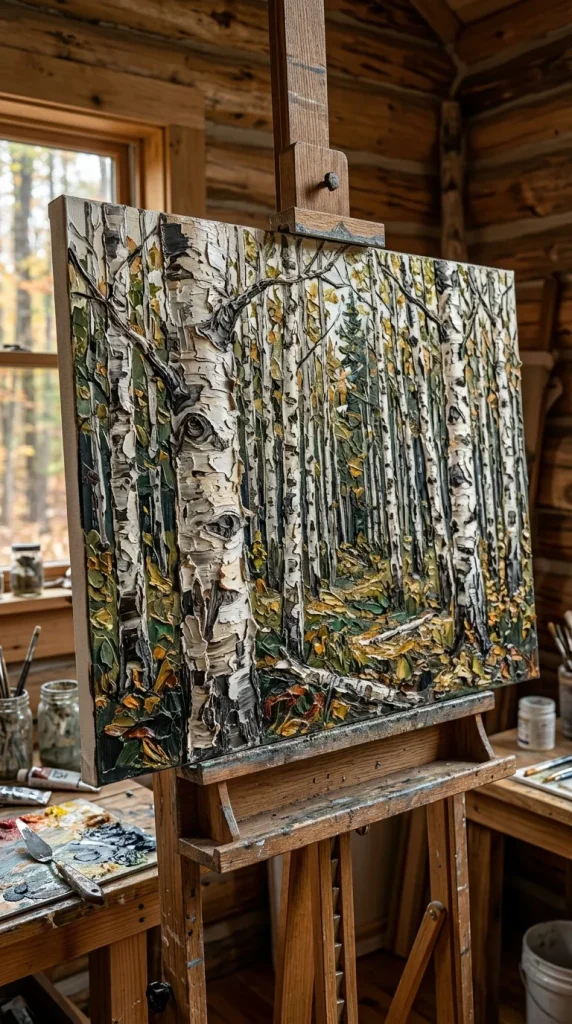
6. Palette Knife Birch Tree Forest
A scenic, semi-abstract nature landscape created by using a palette knife to scrape paint vertically up the canvas to form rustic, textured tree trunks. The distinct dark bark notches of birch trees are added using the flat edge of the knife blade.
- Who It Suits Best: Nature lovers, rustic cottagecore decorators, and crafters wanting to transition from traditional brushes to palette knife painting.
- Application & Execution Tips: Paint a soft, hazy background sky first using large brushes. Once dry, place strips of tape vertically to define your tree trunks, scrape thick white paint over them with your knife to build texture, peel the tape, and then use black paint on the knife’s edge to drag horizontal bark lines across the trunks.
- Benefits: The built-up paint gives the trees a realistic, bark-like texture that physically pops off the canvas, capturing a rugged forest atmosphere.
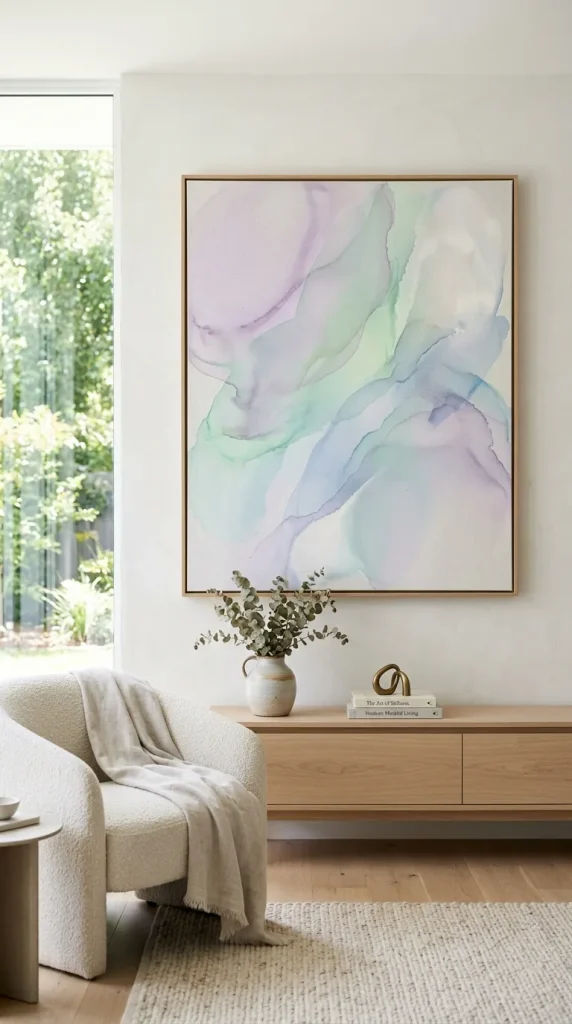
7. Translucent Watercolor-Style Acrylics
By heavily diluting acrylic paints with water or an acrylic glazing liquid, you can mimic the ethereal, soft, bleeding washes of traditional watercolors on a sturdy, archival canvas that doesn’t warp or require framing behind glass.
- Who It Suits Best: Lovers of soft pastel aesthetics, light airy interiors, and painters looking for a delicate, fluid medium without the mess of heavy pouring.
- Application & Execution Tips: Mist your canvas with a spray bottle of clean water before applying your thinned paint. This allows the colors to flow and bleed softly into one another. Use a soft, fluffy mop brush to guide the pigment without leaving harsh, visible brush strokes.
- Benefits: It creates a highly serene, cloud-like visual effect that brings a gentle, bright, and sophisticated energy to any room.
8. Striking Ombre Sunset Silhouette
A vibrant, glowing color transition that blends warm yellow into fiery orange, deep red, and dark violet. Once this gorgeous background gradient is perfectly smooth, crisp black silhouettes of palm trees, city skylines, or mountain peaks are painted over top.
- Who It Suits Best: Beginners who want to master smooth color transitions and gradients while achieving a highly recognizable, dramatic final image.
- Application & Execution Tips: Keep your brush strokes strictly horizontal when blending the sunset colors, working quickly while the paint is wet so the boundaries meld together softly. Use an intense, highly pigmented mars black paint for the foreground silhouette to maximize the contrast.
- Benefits: The high contrast between the glowing background and the solid black silhouette creates a brilliant, eye-catching depth that makes the sunset look three-dimensionally backlit.

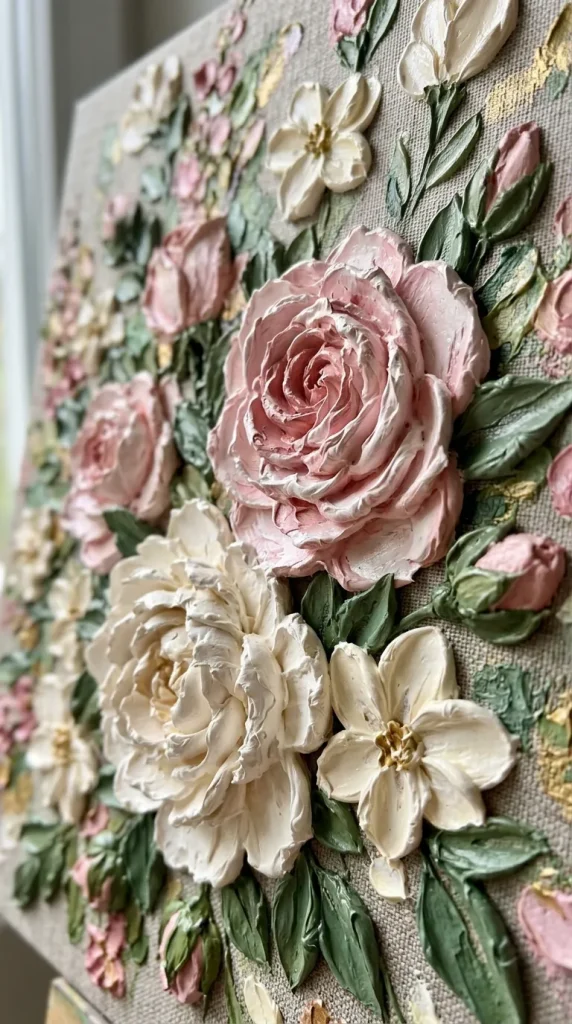
9. Impasto Sculpted Floral Palettes
Using a heavy-body acrylic paint or mixing regular acrylics with a thick gel medium, you use a teardrop-shaped palette knife to scoop and sculpt individual flower petals directly onto the canvas. The result is a lush, thick floral arrangement you can literally feel.
- Who It Suits Best: Romantic spirits, lovers of classical vintage aesthetics, and those who enjoy highly tactile, expressive, and thick artistic styles.
- Application & Execution Tips: Think of the paint like thick cake frosting. Scoop a small dollop onto the back of your palette knife, press it firmly onto the canvas at an angle, and pull back gently to form a perfect, raised, organic flower petal.
- Benefits: It adds incredible structural dimension to your art. The flowers physically cast their own tiny shadows on the canvas, changing the look of the painting depending on how light enters the room.
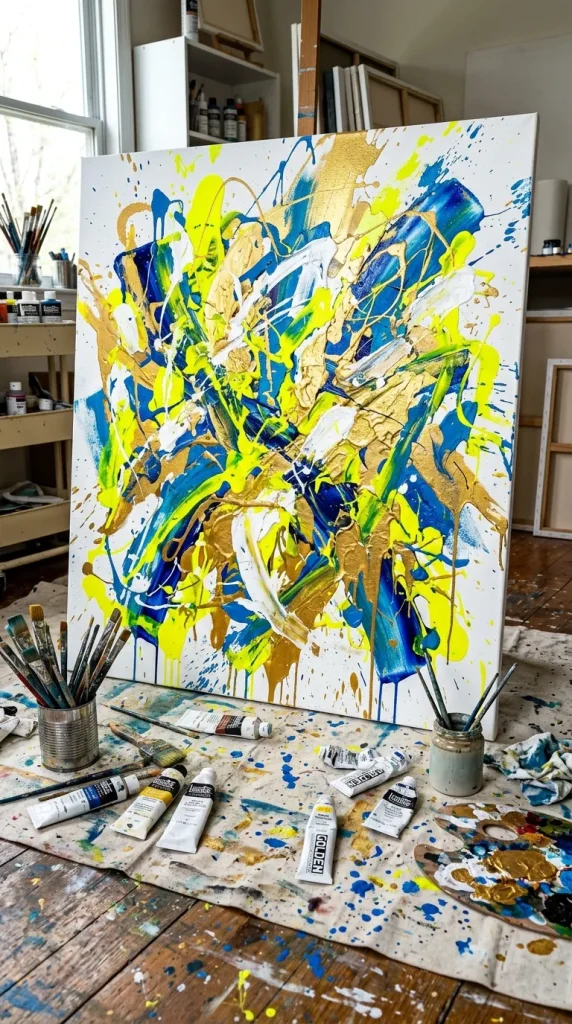
10. Abstract Splatter Art Expressionism
An energetic, modern art form popularized by Jackson Pollock. By loading long-bristled brushes, sticks, or toothbrushes with fluid paint and flicking, dropping, or swinging them above a canvas laid flat on the floor, you capture raw movement and joy.
- Who It Suits Best: Energetic creators, children, and anyone looking to break out of rigid artistic boundaries and experience total creative freedom.
- Application & Execution Tips: Dilute your paints slightly so they fly easily off the brush. Lay down a massive plastic drop cloth to protect your floors and walls completely. Layer your splatters, starting with dark base splatters and finishing with bright, vibrant neon or metallic gold accent drops.
- Benefits: It is an incredibly fun, cathartic, and physical process that results in a dynamic, high-energy conversation piece that radiates movement and modern style.
Pro Tips for Studio-Quality Canvas Art
To elevate your DIY projects from a standard weekend craft to a polished piece of fine art, follow these essential professional guidelines:
1. Prime Your Canvas with Gesso: Even pre-primed store canvases benefit immensely from an extra coat of gesso. It smooths out rough fabric weaves, stops your paint from sinking into the canvas fibers, and keeps your colors incredibly bright.
2. Protect Your Work with Varnish: Always apply a clear archival varnish (available in matte, satin, or high-gloss) once your painting is dry. This shields your artwork from UV fading, dust, and moisture damage for decades to come.
3. Keep a Wet Paper Towel Nearby: Acrylic paint dries incredibly fast. Keeping a damp microfiber cloth handy allows you to wipe away mistakes, messy lines, or stray drips instantly before they bond permanently to the canvas.
4. Paint the Edges of Your Canvas: Don’t leave the outer sides of your canvas blank and white. Wrapping your background color or continuing your pattern around the edges gives the piece a professional, gallery-wrapped finish that looks stunning even without an expensive frame.
Common Canvas Painting Mistakes to Avoid
- Using Too Much Water with Basic Acrylics: Over-diluting cheap acrylic paint with water (more than 30%) breaks down the acrylic polymer binding agent. This causes the paint to dry with an uneven, chalky texture that can easily scratch off later. Use an acrylic thinning medium instead.
- Overworking Your Paint Layers: Trying to blend colors directly on the canvas for too long will start to lift up the half-dry layers underneath. This creates a muddy, clumpy, or patchy texture. Blend quickly, or let it dry completely before layering over it.
- Using the Wrong Brush for the Job: Trying to paint clean, fine lines with a fuzzy, split-ended brush or trying to fill a massive background with a tiny detail brush leads to immense frustration. Match your brush size to your canvas scale.
Conclusion
Finding the perfect painting ideas on canvas is all about matching your unique personality with a technique that brings you joy rather than stress. From the heavy, sculptural ridges of high-texture abstracts to the energetic freedom of vibrant splatter expressionism, there is a style here for absolutely everyone.
The blank canvas doesn’t need to be intimidating—it is simply an invitation to play, experiment, and unwind. Choose your favorite concept from this list, grab a basic starter pack of paints, and give yourself permission to create something wonderful today.
Which canvas style are you excited to paint first? Let us know in the comments below, and share your beautiful completed masterpieces with our community to spark creativity in others!
Frequently Asked Questions (FAQs)
What is the best type of paint to use on canvas for beginners?
Acrylic paint is universally considered the best choice for beginners. It is water-soluble, dries incredibly fast, emits very little odor compared to oils, and can be cleaned up easily with simple soap and water while still wet.
How long does it take for a canvas painting to dry completely?
Standard acrylic paint layers dry to the touch within 20 to 60 minutes. However, thick impasto textures, palette knife layers, or heavy fluid pours can take anywhere from 24 hours to a full week to cure completely beneath the surface.
Can I paint over a canvas if I don’t like my first attempt?
Yes, absolutely! One of the biggest advantages of acrylic paint is its opacity. If you are unhappy with your artwork, simply let it dry completely, apply one or two smooth coats of white gesso or acrylic paint over it, and start fresh with a brand-new design.
How do I prevent my acrylic paints from drying out too fast on my palette?
You can use a specialty “stay-wet palette,” or simply mist your paint palette lightly with water from a fine spray bottle every 15 minutes. Alternatively, covering your palette with plastic wrap during short breaks will keep the paint fresh for hours.