Master floral arrangements DIY styles at home. Discover 10 breathtaking centerpiece ideas, pro conditioning tips, and design secrets to build expert bouquets.
floral arrangements diy, homemade flower centerpieces, amateur florist guide, conditioning fresh cut flowers, spiral bouquet technique, architectural flower design.
There is something undeniably magical about walking into a room graced by fresh, vibrant blossoms. They instantly elevate our spirits, add an exquisite organic softness to our living spaces, and make any ordinary day feel like a special occasion. Whether you are hosting an intimate dinner party, celebrating a milestone, or simply wanting to brighten your entryway console, beautiful blossoms are the ultimate design accessory.
However, buying premium, pre-made centerpieces from high-end boutiques can quickly become an expensive luxury. On the flip side, trying your hand at building your own centerpiece can feel incredibly frustrating. We have all been there: you buy a gorgeous bundle of fresh stems from the local market, bring them home, trim them, and drop them into a vase—only for the heavy heads to flop sadly over the rim, leaving an awkward, empty gap right in the middle of your display.
You do not need an expensive floral design degree or professional florist tools to achieve a breathtaking, high-end look. The secret lies in mastering basic, structural floral arrangements diy techniques. By understanding how to prep your stems, build hidden foundations, and layer focal flowers with delicate accent greenery, you can create professional-grade displays at a fraction of the cost. This comprehensive guide breaks down 10 stunning, trend-forward floral design concepts, complete with expert advice to help you design with complete confidence.
Technical Comparison of DIY Floral Design Concepts
Before choosing your design theme, review this practical reference table. It evaluates the assembly time, styling difficulty, and water maintenance requirements for each floral arrangement style.
| Floral Arrangement Concept | Assembly Time | Technical Difficulty | Maintenance Level | Best Vase Type |
| Monochromatic Rose Dome | 20–30 Mins | Low | Low (Change water daily) | Classic Round Ceramic |
| Wild Asymmetrical Meadow | 30–45 Mins | High | Medium (Mist daily) | Wide-Mouth Low Ceramic Bowl |
| Sleek Minimalist Ikebana | 15 Mins | Medium | Low | Shallow Ceramic Pin Frog Dish |
| High-Volume Spiral Bouquet | 30 Mins | High | Medium | Fluted Clear Glass Urn |
| Rustic Mason Jar Grid | 15 Mins | Low | Low | Trio of Clear Mason Jars |
| Architectural Eucalyptus Wrap | 20 Mins | Low | Very Low (Long-lasting) | Tall Cylinder Glass Vase |
| Whimsical Floating Blossom Bowl | 10 Mins | Low | High (Change water often) | Shallow Glass or Stone Basin |
| Tropical Paradise Canopy | 25–35 Mins | Medium | Low | Heavy Structured Stoneware Jug |
| Ombre Gradient Bud Vases | 15 Mins | Low | Low | Collection of Varied Glass Bottles |
| Cascade Greenery Garland | 45–60 Mins | High | High (Needs fresh hydration) | Long Table Runner/No Vase |
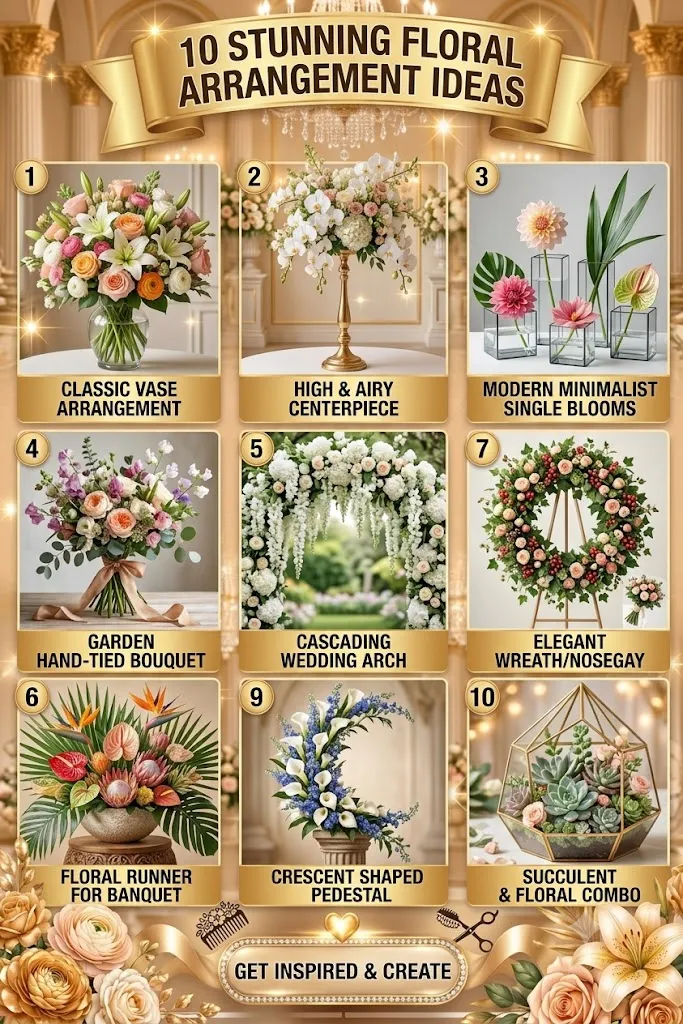
10 Breathtaking Floral Arrangements DIY Ideas to Master
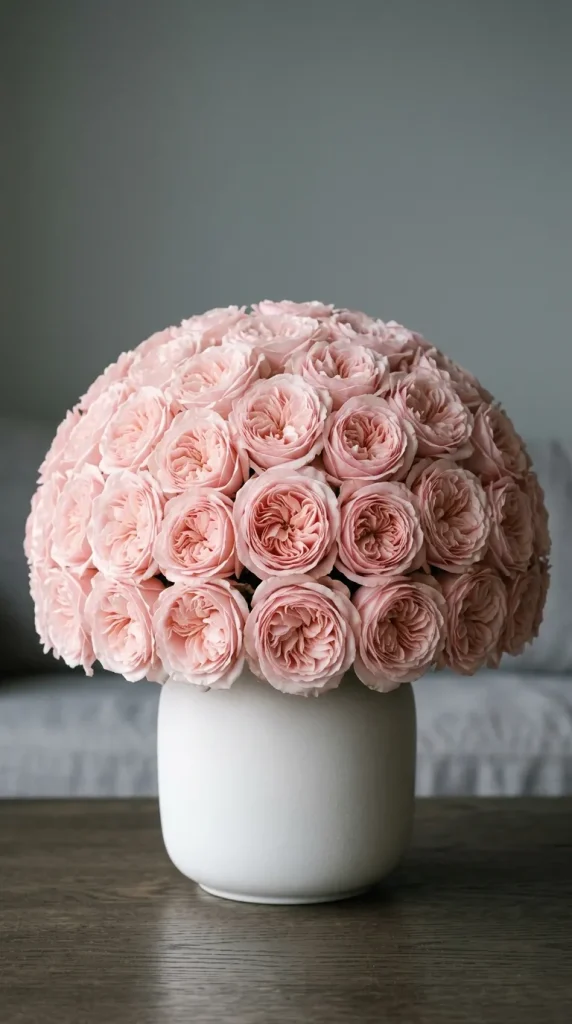
1. The Monochromatic Rose Dome
This elegant concept focuses on a single, uniform flower variety—such as premium garden roses, ranunculus, or carnations—tightly packed in a dome shape. The stems are cut to an identical length, creating a dense, velvety mound of color that completely hides the rim of the vase.
- Who It Suits Best: Lovers of timeless, clean, classic, or Parisian boutique aesthetics. It is an exceptionally easy and forgiving design for absolute beginners.
- Design & Styling Tips: Use a chicken wire ball or a tape grid across the mouth of a round ceramic vase to hold the stems firmly in place. Start placing stems around the outer rim at an angle, working your way inward in concentric circles, raising the height of the center stems slightly to form a perfect, smooth dome.
- Key Benefits: It provides a clean appearance that looks incredibly expensive and high-end due to the sheer density of the blooms. It requires zero complex color-matching skills.
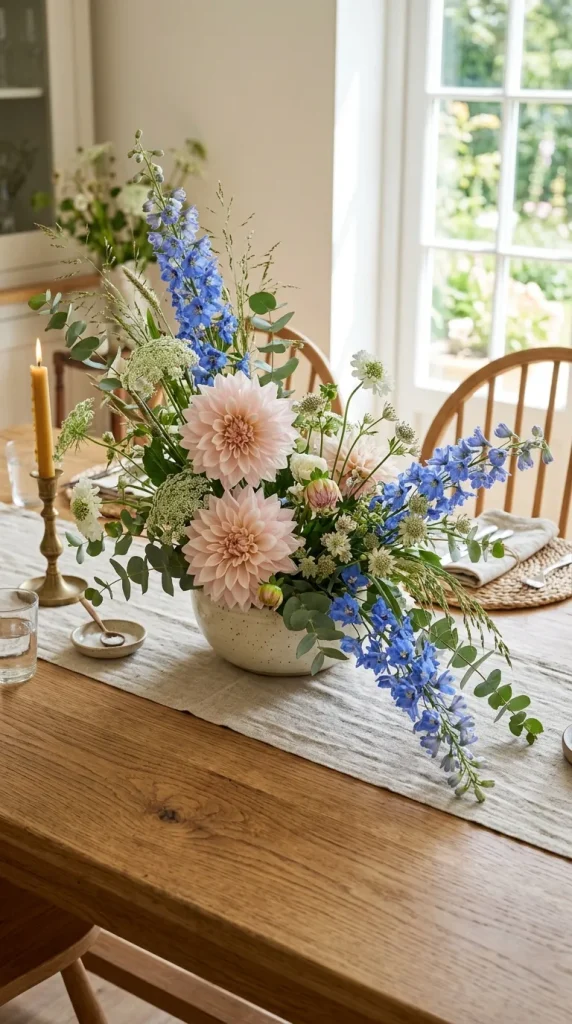
2. The Wild Asymmetrical Meadow
Inspired by natural, untamed country gardens, this contemporary style embraces sweeping movement, varied heights, and deliberate asymmetry. It features a beautiful mix of branching greens, textural seed pods, tall line flowers, and focal blooms that spill over one side.
- Who It Suits Best: Fans of bohemian, organic modern, or rustic farmhouse interior styles who prefer a natural, free-flowing look over rigid structure.
- Design & Styling Tips: Use a low, wide-mouth ceramic bowl fitted with a heavy metal pin frog (kenzan) or crumpled chicken wire. Establish your dynamic shape first using sweeping branches of eucalyptus or jasmine vine, then insert your large focal flowers (like dahlias or peonies) off-center to anchor the weight.
- Key Benefits: This approach celebrates imperfection, allowing you to easily incorporate interesting, bent branches or unique wildflowers gathered from your backyard.
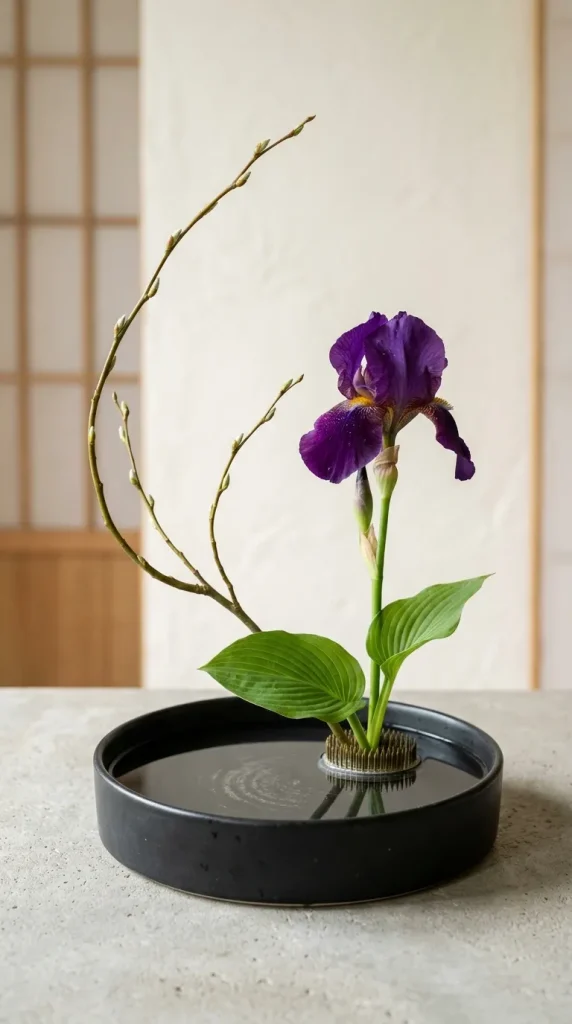
3. The Sleek Minimalist Ikebana
Rooted deeply in the traditional Japanese art of flower arrangement, this concept uses line, negative space, and form. It features very few stems—often just three elements representing heaven, humanity, and earth—carefully positioned to highlight their natural lines.
- Who It Suits Best: Modern minimalists, architectural enthusiasts, and anyone who appreciates clean lines, serenity, and Wabi-Sabi design principles.
- Design & Styling Tips: Secure a heavy metal pin frog directly into a shallow ceramic dish filled with water. Select a single, beautifully curved branch for height, one striking focal bloom (such as an iris, lily, or anthurium), and a low, flat leaf to anchor the base. Trim away any distracting foliage to keep the lines clean.
- Key Benefits: This style uses very few flowers, making it incredibly cost-effective while delivering a bold, dramatic visual impact.
4. The High-Volume Hand-Tied Spiral Bouquet
This professional florist technique involves holding stems in your hand and crossing them in a single, continuous direction to form a spiral pattern. As you add more stems, the bouquet flares out naturally, creating a full centerpiece that can stand on its own.
- Who It Suits Best: Intermediate crafters who want to master a core floristry skill to create elegant hand-delivered gift bouquets or full vase inserts.
- Design & Styling Tips: Strip all foliage off the lower two-thirds of every single stem; leaves trapped under water will rot and ruin your arrangement. Hold your first main stem in your non-dominant hand, then lay every additional stem across it at a consistent 45-degree angle, rotating the bouquet as you work.
- Key Benefits: The spiral technique prevents stems from crushing each other, maximizes the visual volume of your flowers, and allows the bundle to sit beautifully in any fluted glass urn.
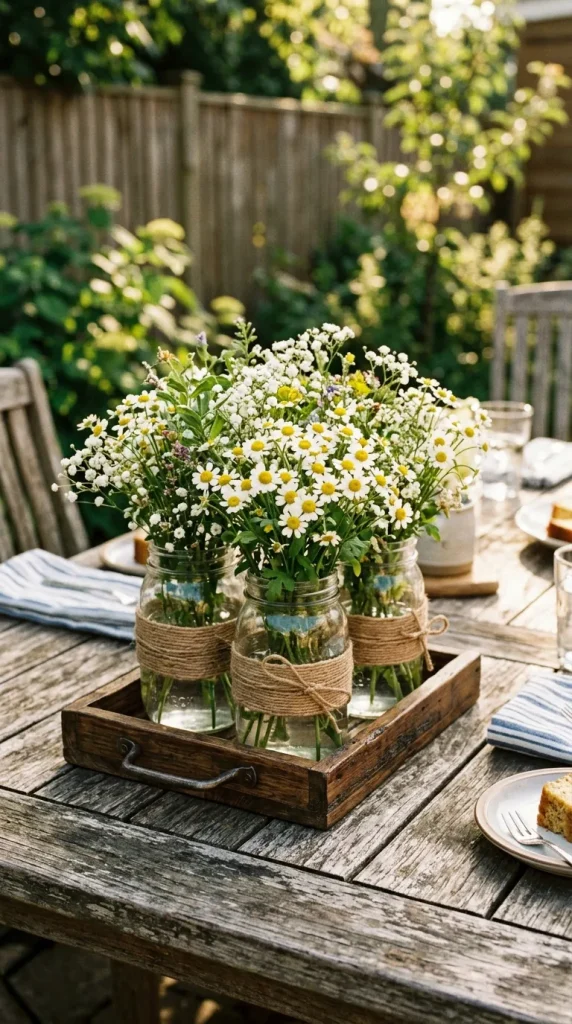
5. The Rustic Mason Jar Grid
A charming approach that utilizes everyday household items, this design clusters three to five mismatched mason jars together inside a wooden tray. Each jar is wrapped with jute twine and filled with an easy mix of cottage garden flowers like chamomile daisies, spray roses, and baby’s breath.
- Who It Suits Best: Casual entertainers, rustic wedding DIYers, and anyone looking for a warm, welcoming table display for a backyard brunch.
- Design & Styling Tips: Instead of trying to build one large arrangement, treat each jar as a micro-design. Place a single focal flower in each jar, then fill the remaining space with light fillers and delicate greens.
- Key Benefits: It is incredibly fast to assemble, easy to modify, and the low profile ensures guests can easily chat across the dining table without their view being blocked.
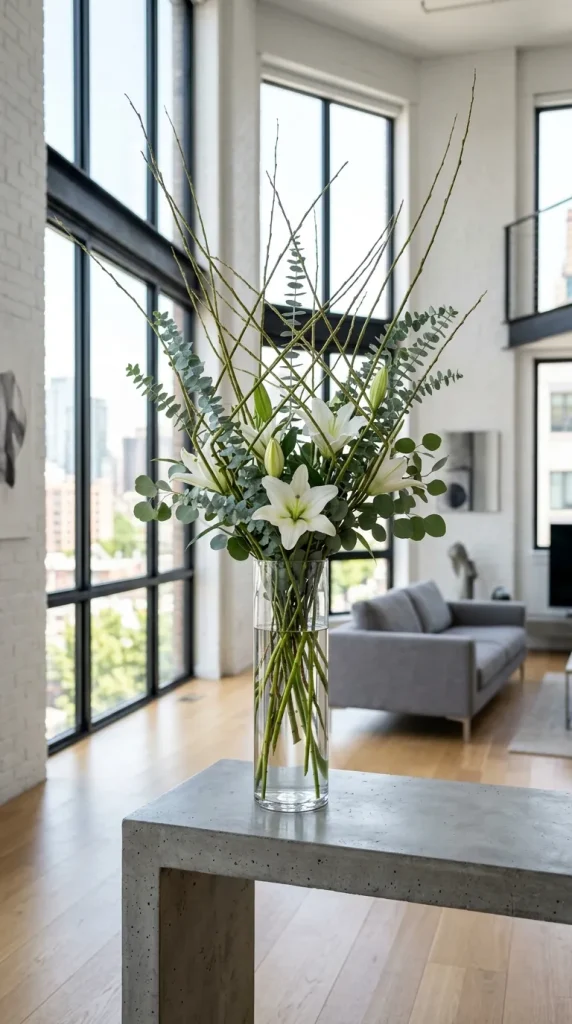
6. Architectural Eucalyptus & Willow Wrap
This long-lasting, foliage-forward design relies on varied textures of green leaves, such as silver dollar eucalyptus, willow branches, and dark glossy magnolia leaves, accented by a few structural white lilies or single-stem orchids.
- Who It Suits Best: People who want an elegant display that lasts for weeks rather than days. It beautifully complements industrial loft and contemporary interior styles.
- Design & Styling Tips: Fill a tall, heavy cylinder glass vase with clean water. Criss-cross your woody branches first to create a strong interior matrix, then slip your long-stemmed focal flowers through the greenery framework so they stay perfectly upright.
- Key Benefits: Eucalyptus dries beautifully right in the vase, meaning the structural framework of your arrangement can last for up to a month with simple water top-offs.
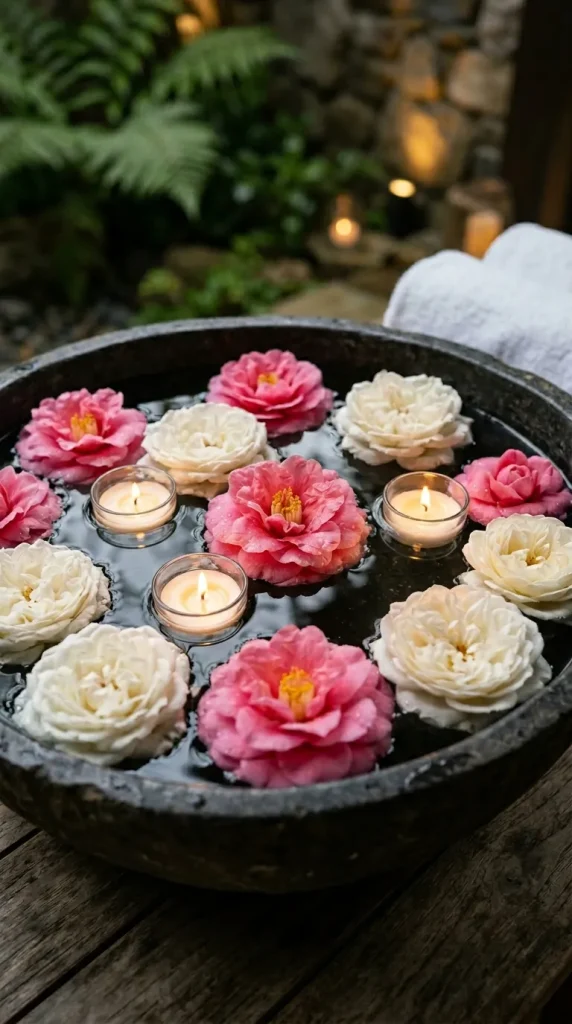
7. Whimsical Floating Blossom Bowl
This delicate style involves snipping the stems completely off short or broken blossoms and floating the flower heads face-up in a shallow stone or glass basin filled with clear water, accented by a few floating tea candles.
- Who It Suits Best: Perfect for maximizing broken stems or faded bouquets. It creates a serene, spa-like accent for bathrooms, entryways, or relaxing dinner tables.
- Design & Styling Tips: Choose flat-bottomed, open-faced flowers that naturally float well, such as fully opened garden roses, camellias, gerbera daisies, or water lilies. Cut the stem completely flush to the base of the calyx so the head sits level on the water surface.
- Key Benefits: It gives a brilliant second life to flowers whose stems were accidentally bent or snapped, creating a relaxing ambiance.
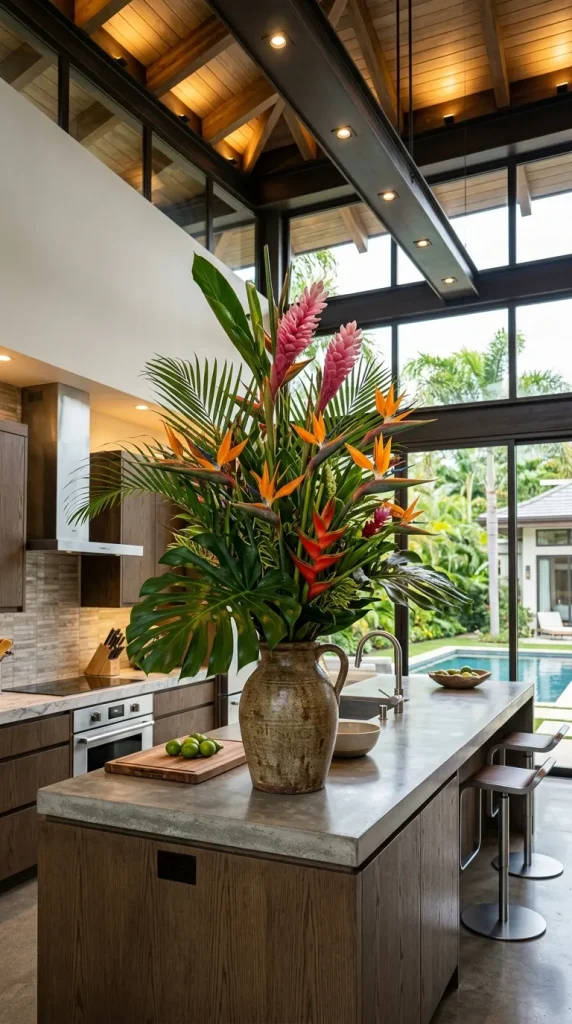
8. The Tropical Paradise Canopy
A bold, dramatic style that uses large-scale elements like glossy monstera leaves, birds of paradise, ginger blossoms, and fan palms to build a tall, architectural display full of rich color and vacation vibes.
- Who It Suits Best: Bold homeowners with high ceilings who want an eye-catching statement piece for a grand foyer or a large kitchen island.
- Design & Styling Tips: Because tropical stems are heavy, use a substantial, weighted stoneware or ceramic jug to prevent tipping. Clean the large monstera leaves with a damp cloth to make them shine before arranging.
- Key Benefits: Tropical flora is incredibly hardy and resistant to wilting, making this an exceptionally durable choice for warm, humid summer months.
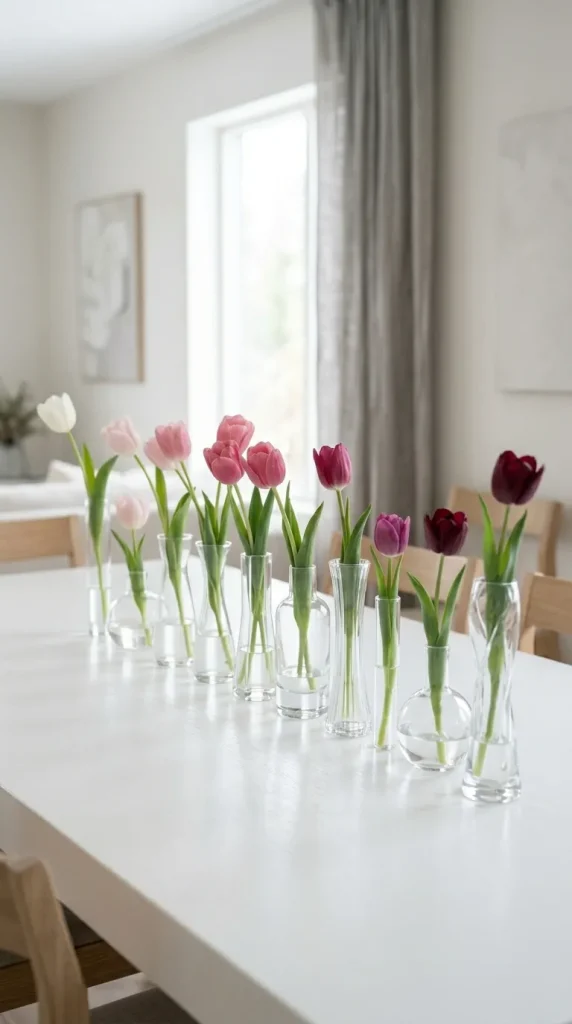
9. Ombre Gradient Bud Vases
This modern look involves arranging a long row of small, clear glass bottles down the center of a table, with each vase holding just one or two stems. The flowers are arranged by shade to create a beautiful color transition from light to dark.
- Who It Suits Best: Lovers of clean contemporary styles and dinner hosts who want an elegant centerpiece without handling bulky vases.
- Design & Styling Tips: Collect assorted glass bottles of varying heights. Select a single flower family, like carnations or tulips, in shades ranging from soft blush and medium pink to deep burgundy, and arrange them in order down your table.
- Key Benefits: It takes up very little tabletop space, allows you to use short or single stems effectively, and makes clean-up quick and easy.
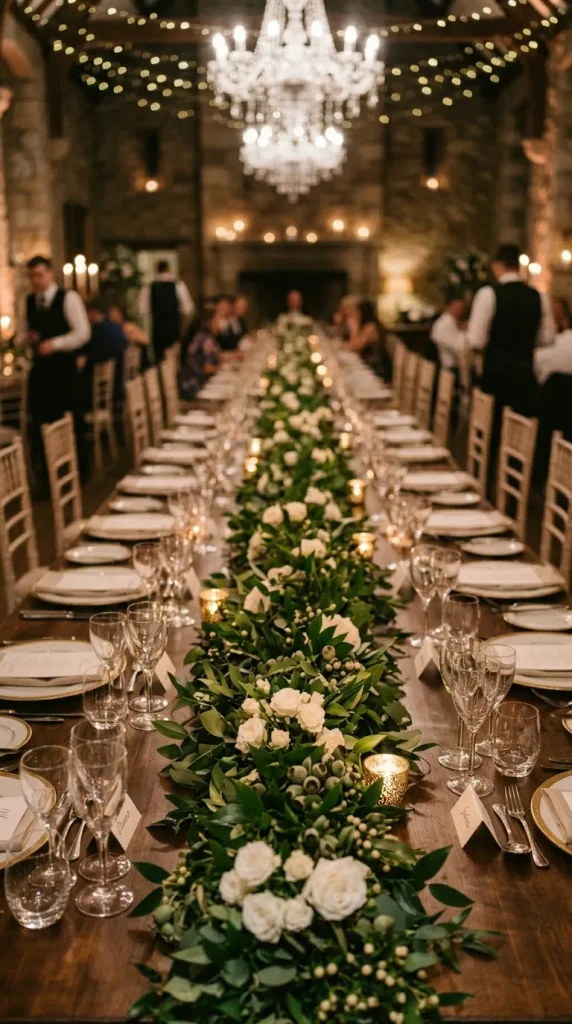
10. The Cascading Greenery Table Garland
A festive option that skips vases entirely, this style involves weaving long strands of fresh greenery, such as Italian ruscus, seeded eucalyptus, and ivy vines, directly down the center of a long dining table, accented with tucked-in focal flowers.
- Who It Suits Best: Holiday hosts and event planners looking for an elegant, banquet-style dining experience.
- Design & Styling Tips: Lay down a base layer of thick, sturdy greenery stems first, overlapping the ends to create a continuous chain. Conceal small plastic water tubes (floral water picks) on your focal flower stems before tucking them into the greenery to keep them fresh throughout the evening.
- Key Benefits: It creates an incredibly luxurious, celebratory dining atmosphere and keeps the center of the table low, allowing conversation to flow easily.
Pro Tip: The Clean-Water Mandate
The secret to making your DIY floral designs last twice as long doesn’t come from a magical packet of flower food—it comes down to eliminating bacteria. Bacteria quickly clogs the tiny water-drinking vessels inside flower stems, causing them to wilt prematurely. Always wash your vases with hot, soapy water and a touch of bleach until they are clean enough to drink from before starting your design. Change the water completely every single day.
Critical DIY Floral Design Mistakes to Avoid
- Leaving Submerged Foliage on Stems: Any leaves, thorns, or small buds left on the lower part of a stem submerged under water will rot quickly. This creates bacteria that spoils the water and shortens the lifespan of your arrangement.
- Cutting Stems Straight Across: Cutting your stems completely flat creates a suction-cup effect against the bottom of your vase, blocking water intake. Always trim your stems at a sharp 45-degree angle using sharp floral shears, never household scissors which can crush the delicate water vessels.
- Placing Arrangements in Direct Sunlight or Drafts: Keeping your finished design near a sunny window, heater vents, or direct air conditioning drafts will quickly dehydrate your blossoms, causing them to drop petals and wilt within days.
- Using Mismatched Scale: Placing massive, heavy hydrangea blooms into a tiny, lightweight glass bud vase will cause it to tip over, while a single delicate tulip can look lost inside a large, wide-mouth vase. Always match the weight and scale of your flowers to your container.
Frequently Asked Questions
How do I properly condition fresh-cut flowers so they last?
Conditioning is the process of prepping flowers to maximize their vase life. When you bring fresh stems home, immediately remove the lower leaves, trim the stems at a 45-degree angle under warm running water, and place them into a clean bucket of lukewarm water mixed with flower food. Let them rest in a cool, dark room for at least two to three hours to fully hydrate before you begin styling.
What can I use instead of toxic green floral foam for structure?
Traditional green floral foam is non-biodegradable and contains microplastics. Excellent eco-friendly alternatives include reusable coated chicken wire crumpled into a loose ball inside your vase, metal pin frogs (kenzan) secured to the bottom of shallow dishes, or creating a sturdy grid pattern across the mouth of your vase using clear waterproof floral tape.
Why are my hydrangeas wilting, and how can I revive them?
Hydrangeas produce a sticky sap that can clog their stems and block water intake. If they begin to wilt, you can try an insider trick: trim the stem again, dip the bottom half-inch into hot water or alum powder (found in the grocery baking aisle) for 30 seconds, and place them back into a clean vase. You can also submerge the entire wilted flower head face-down in a bowl of cold water for 30 minutes; hydrangeas can actually drink water directly through their petals.
Design Your Beautiful Space
Creating your own gorgeous centerpieces is a wonderfully creative way to add life, color, and personal style to your home. Whether you opt for a sleek monochromatic rose dome, a wild asymmetrical meadow display, or a collection of ombre bud vases, mastering these simple structural techniques allows you to design with complete confidence.
Gather your favorite seasonal blossoms, prep your vases properly, and enjoy the relaxing process of bringing natural elegance into your living space.