Looking for sweet, unique ways to say happy birthday? Explore 10 cute birthday card ideas packed with adorable illustrations, clever puns, and craft tips.
cute birthday card ideas, adorable handmade cards, easy drawing for cards, punny birthday greetings, kawaii paper crafts, DIY sweet birthday cards.
Have you ever spent what felt like an eternity shuffling through greeting card racks, only to leave empty-handed because everything looked a bit too stiff, overly formal, or plain boring? You are looking for something that radiates warmth, sparks an immediate smile, and makes the recipient utter an involuntary “aww!” the second they slide it from the envelope. You want to convey sweetness and joy, but the store shelves are filled with generic glitter patterns or paragraphs of text that don’t fit your relationship at all.
The real challenge with standard, store-bought greetings is that they completely lack that whimsical, personal touch. In a fast-paced world dominated by cold text notifications and auto-generated social media wall posts, a manufactured card can easily feel like a last-minute chore rather than a genuine celebration of someone’s life. If you want your card to be the one that gets proudly pinned to the refrigerator, displayed on a work desk, or tucked safely into a memory scrapbook, it needs an abundance of personality, charm, and sweetness.
The absolute best remedy for this gifting dilemma is to explore the wonderful world of cute birthday card ideas. By infusing your paper crafts with cheerful pastel palettes, adorable pun-filled sentiments, quirky smiling characters, and clever tactile details, you can craft a miniature work of art that feels like a warm hug in paper form. Whether you are creating a masterpiece for a toddler, a quirky best friend, a sibling, or a significant other, this deeply comprehensive guide shares 10 exceptionally charming, beginner-friendly card concepts guaranteed to brighten their special day without breaking the bank.

The Psychology of “Cute”: Why Whimsical Cards Leave a Lasting Impression
There is a distinct scientific reason why soft colors, round shapes, and clever little illustrations resonate so deeply with humans. Psychologists note that viewing “kawaii” or endearing imagery instantly triggers the release of dopamine—the feel-good chemical—in our brains. When you gift a card featuring a smiling little piece of toast or a fluffy animal illustration, you are physically elevating the recipient’s mood and creating a powerful, positive emotional anchor to their birthday memories.
To help you seamlessly map out your next crafting session, we have arranged a complete master comparison of our top 10 adorable design concepts below, categorizing their construction time, crafting difficulty, and overall structural durability.
Cute Birthday Card Comparison: Time, Difficulty, and Durability
| Card Design Concept | Construction Time | Crafting Difficulty | Material Density | Lifespan Durability |
| 1. Smiling Kawaii Avocado Duo | 15–20 Mins | Very Low | Low (Paper scrap) | High (Flat design) |
| 2. Fluffy 3D Pom-Pom Bear | 25 Mins | Low | Medium (Yarn/Glue) | Medium (Needs care) |
| 3. Punny “Holy Guacamole” | 20 Mins | Low | Low (Markers) | High (Clean layout) |
| 4. Sweet “O-Fish-Ally” Aquarium | 35 Mins | Medium | Medium (Plastic/Beads) | Medium (Secure edges) |
| 5. Pastel Fingerprint Balloons | 15 Mins | Very Low | Low (Ink pads) | High (Absorbent paper) |
| 6. Peek-a-Boo Sliding Kitty | 45 Mins | High | High (Moving tracks) | Medium (Mechanical parts) |
| 7. “You Bake Me Happy” Cupcake | 30 Mins | Medium | Medium (Plaster/Paper) | High (Textured layers) |
| 8. Hugging Pocket Teddy Bear | 40 Mins | Medium | Medium (Felt strips) | High (Soft materials) |
| 9. Celestial “Love You to the Moon” | 25 Mins | Low | Low (Watercolor) | High (Rich pigments) |
| 10. Quirky Origami Jumping Frog | 30 Mins | High | Medium (Folding sheets) | Medium (Playable card) |
10 Delightful Cute Birthday Card Ideas to Warm Their Hearts
Explore our exhaustive, step-by-step breakdown of the most charming card concepts. Learn exactly how to bring these characters to life, who will love them the most, pro styling tips for a flawless boutique finish, and the structural benefits of each creation.
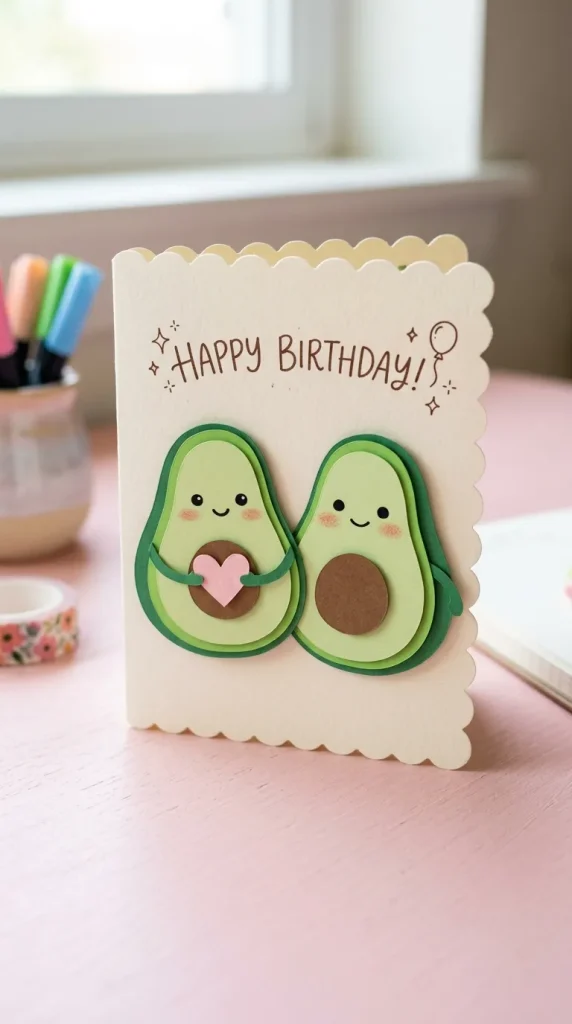
1. The Smiling Kawaii Avocado Duo Card
An incredibly endearing, minimalist design featuring two hand-cut green paper avocados standing side by side. One avocado holds a tiny pink paper heart, while the other features a round brown seed. Both sport tiny, hand-drawn blushing cheeks and cheerful dot eyes, perfectly symbolizing the beauty of a close friendship or partnership.
- Who It Suits Best: Best friends, romantic partners, soulmates, and anyone who appreciates modern, lighthearted internet-culture humor.
- Styling & Care Tips: Cut the outer avocado rind from a dark forest-green cardstock, and the inner flesh from a soft lime-green shade to create an attractive dual-toned look. Use a glossy black gel pen to draw the eyes so they catch the light, and use a pink colored pencil to softly shade the blushing cheeks.
- Benefits: It requires very little paper, relies on basic geometric shapes that are highly forgiving to cut, and remains perfectly flat, making it ideal for smooth, damage-free mailing via standard postal envelopes.
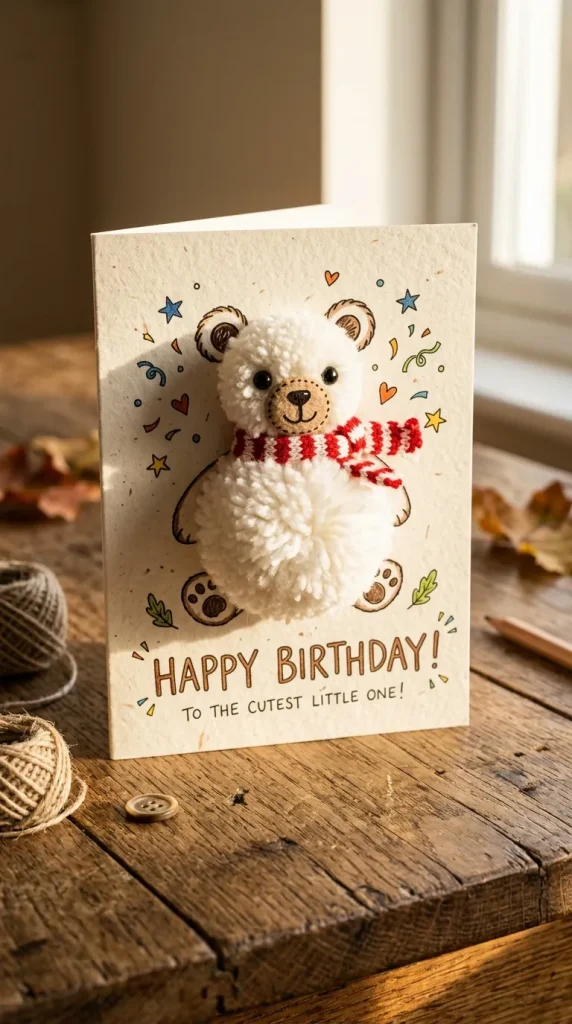
2. The Fluffy 3D Pom-Pom Bear Card
A wonderfully tactile, mixed-media masterpiece where the body of a cute little teddy bear is formed by attaching a plush, handmade or store-bought yarn pom-pom directly to the center of the card panel. The head, ears, and paws are neatly illustrated around the woolly center, creating an irresistible urge to touch it.
- Who It Suits Best: Toddlers, young children, grandmothers, and anyone who finds immense joy in soft, cozy textures and comforting sensory gifts.
- Styling & Care Tips: Use a heavy-duty, fast-drying tacky glue or a hot glue gun to anchor the yarn pom-pom securely to your cardstock base so it doesn’t detach in transit. Keep the illustrated background simple with a minimal border line so the plush bear remains the absolute star of the show.
- Benefits: The striking combination of flat cardstock and fluffy, raised yarn creates a lovely three-dimensional depth that immediately sets it apart from ordinary flat paper products.
3. The Punny “Holy Guacamole” Taco Celebration
This ultra-colorful card combines cheerful food illustration with a witty, laugh-inducing birthday pun. It features a bright yellow taco shell character filled with green paper tissue lettuce and tiny red confetti tomatoes, wearing a festive miniature paper party hat tilted casually to one side.
- Who It Suits Best: Coworkers, casual friends, foodies, and individuals who prefer lighthearted, humorous, and witty birthday greetings over deeply sentimental messages.
- Styling & Care Tips: Write the phrase “Holy Guacamole, You’re Another Year Older!” across the top using a playful, bouncy faux-calligraphy font style. Use crinkled green tissue paper scraps for the taco lettuce fillings to introduce a realistic, crinkled texture to the food display.
- Benefits: The bright, saturated yellow and green color scheme is instantly energizing and festive. The built-in humor breaks the ice perfectly, making it an incredibly safe yet highly memorable choice for almost anyone on your list.

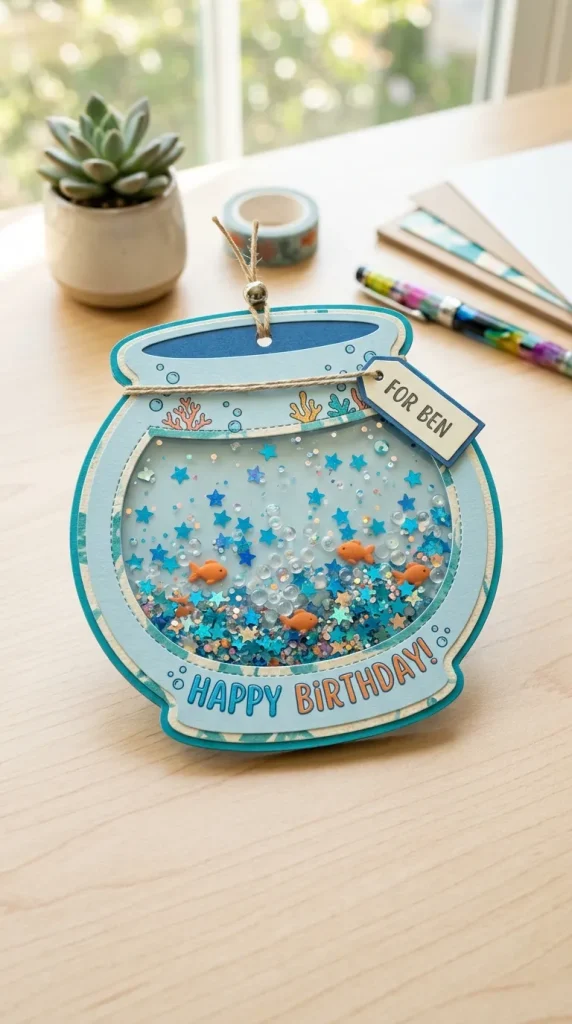
4. The Sweet “O-Fish-Ally” Aquarium Shaker
A beautiful aquatic-themed card containing a clear, circular acetate bubble window fashioned into a fishbowl. Inside the window, a pair of tiny orange clay goldfish float amidst a glittering sea of blue sequins, glass seed beads, and star confetti that shifts and splashes playfully whenever the card is moved.
- Who It Suits Best: Teenagers, novelty collectors, and anyone who deeply appreciates interactive, kinetic craft engineering and sparkling visual flair.
- Styling & Care Tips: Use a fine-tip permanent marker to draw delicate water bubbles drifting upwards from the fishbowl window. Ensure your double-sided foam tape border forms a completely airtight circle around the window to guarantee none of your fine glitter or sequins escape.
- Benefits: It functions seamlessly as an entertaining sensory toy and a gorgeous card, capturing the recipient’s focus and inviting them to play with the shaking mechanism again and again.
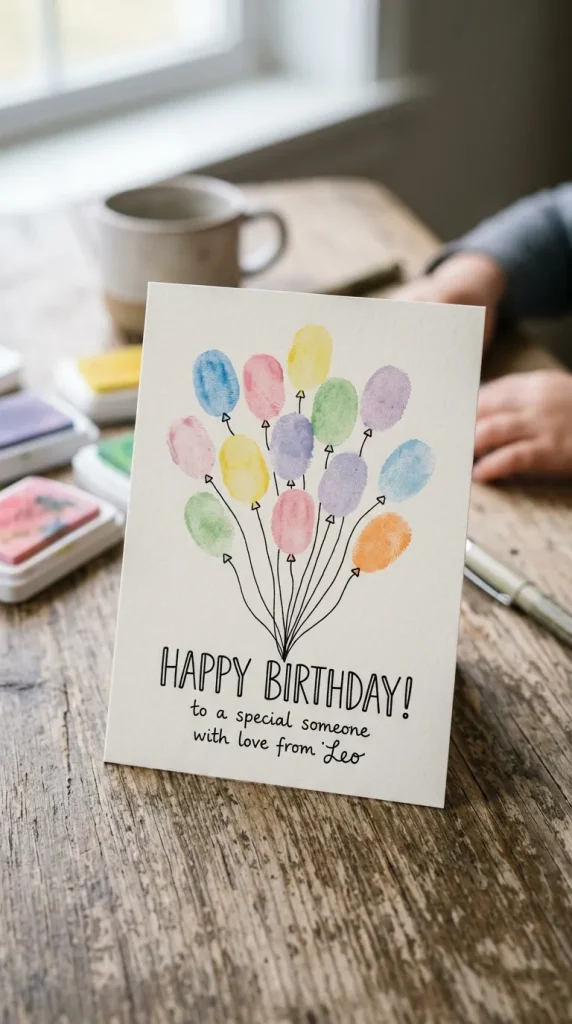
5. The Pastel Fingerprint Balloons Card
An exceptionally personal, sentimental card where the birthday balloons are created using your own colored fingerprints! By dipping your fingertips into soft pastel ink pads (lavender, mint, buttercup yellow, and baby pink) and stamping them onto the card, you build a beautiful, colorful bunch of floating balloons tied together with hand-drawn twine strings.
- Who It Suits Best: Parents, grandparents, close family relatives, or mentors who cherish deeply personal, sentimental, and human-centric gifts.
- Styling & Care Tips: Use a high-quality, acid-free pigment ink pad so your fingerprints remain vibrant and don’t fade over time. Once the thumbprints are dry, use an ultra-fine black technical pen to draw a little string tied to the bottom of every individual print, anchoring them to a tiny hand-drawn basket below.
- Benefits: It is incredibly budget-friendly, takes less than fifteen minutes to assemble, and holds massive emotional value because your actual unique fingerprint is permanently woven into the design artwork.
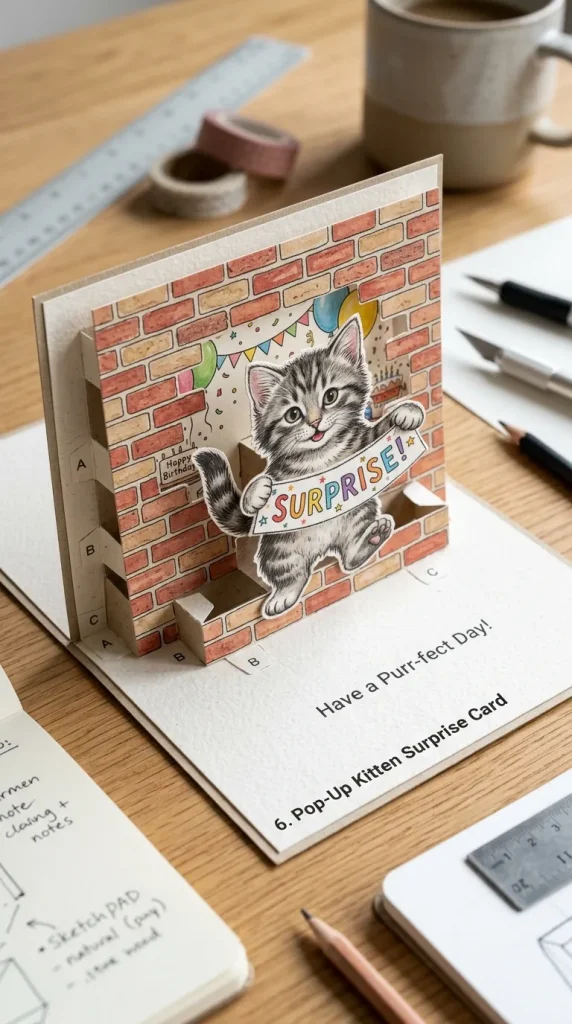
6. The Peek-a-Boo Sliding Kitty Card
An ingenious mechanical paper creation featuring a cute kitten hidden behind a sleek illustrated garden wall or present box. When the recipient pulls a small paper tab at the top of the card, the sliding track shifts, causing the cute little cat to pop up with wide eyes, holding a tiny sign that reads “Surprise!”
- Who It Suits Best: Cat lovers, animal enthusiasts, kids, and crafters who love constructing clever, interactive mechanical paper pop-ups.
- Styling & Care Tips: Use a smooth craft craft knife and a metal ruler to cut your interior sliding tracks perfectly straight, ensuring the mechanism moves smoothly without catching. Color the kitty to look exactly like the recipient’s real-life pet cat for an extra-thoughtful touch of personalization.
- Benefits: The hidden surprise element creates an immediate, memorable moment of genuine delight upon opening, making the card an instant conversation piece.
7. The “You Bake Me Happy” Puffy Cupcake
A deliciously sweet card centered around a whimsical birthday cupcake illustration. The frosting is brought to life using a unique DIY puffy paint mixture (equal parts white school glue and shaving cream mixed with a drop of pink paint) that dries into a thick, pillow-soft, squishy three-dimensional texture that looks exactly like real bakery frosting.
- Who It Suits Best: Bakers, sweet tooths, sisters, daughters, and anyone who adores soft, romantic pastel baking aesthetics and tactile textures.
- Styling & Care Tips: While your DIY puffy paint icing layer is still wet, gently drop real multi-colored baking sprinkles or tiny glass seed beads directly onto it. They will dry embedded firmly inside the puffy mixture, completely mimicking a fresh gourmet birthday cupcake.
- Benefits: The incredible, cloud-like texture rises dramatically off the page, providing a spectacular, eye-catching visual element that ordinary flat markers simply cannot achieve.

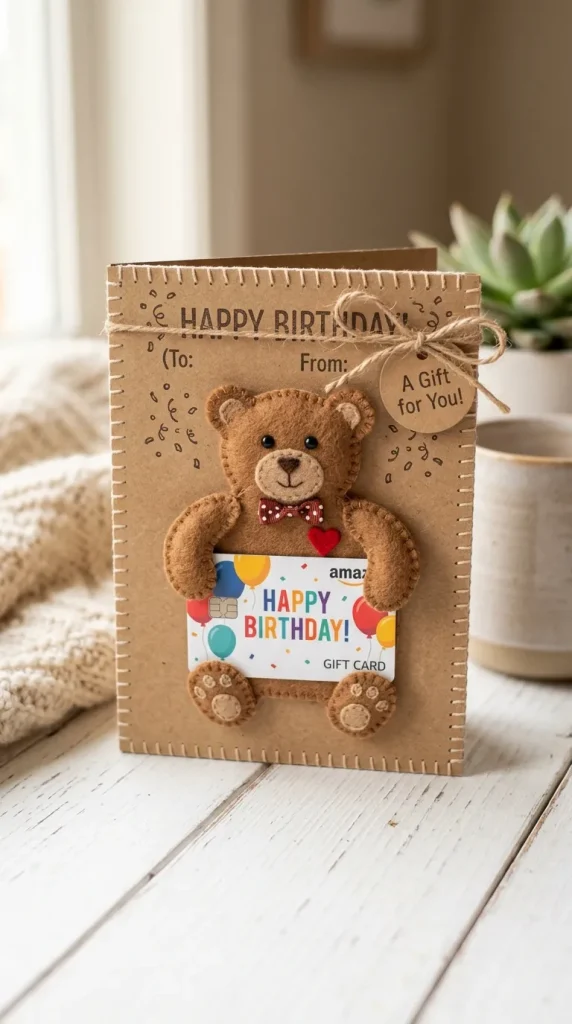
8. The Hugging Pocket Teddy Bear Card
A comforting, high-touch design where a cardstock teddy bear is attached to the front of the card with its paws folded forward, forming a physical pocket. Tucked neatly inside the bear’s arms is a removable, miniature secondary card or a real gift card pocket that reads “A Big Birthday Hug for You!”
- Who It Suits Best: Long-distance friends, family members you haven’t seen in a while, or anyone to whom you want to present a standard retail gift card or cash gift in an incredibly thoughtful, creative presentation wrapper.
- Styling & Care Tips: Cut the bear’s body from soft brown kraft paper or a thin sheet of real crafting felt to make the animal feel even warmer and more inviting. Leave the arms unglued along the center so they can easily slide open and hold the interior card secure.
- Benefits: It beautifully solves the common problem of presenting gift cards or monetary gifts in an uninspired envelope by turning the carrier container into an adorable, affectionate keepsake.
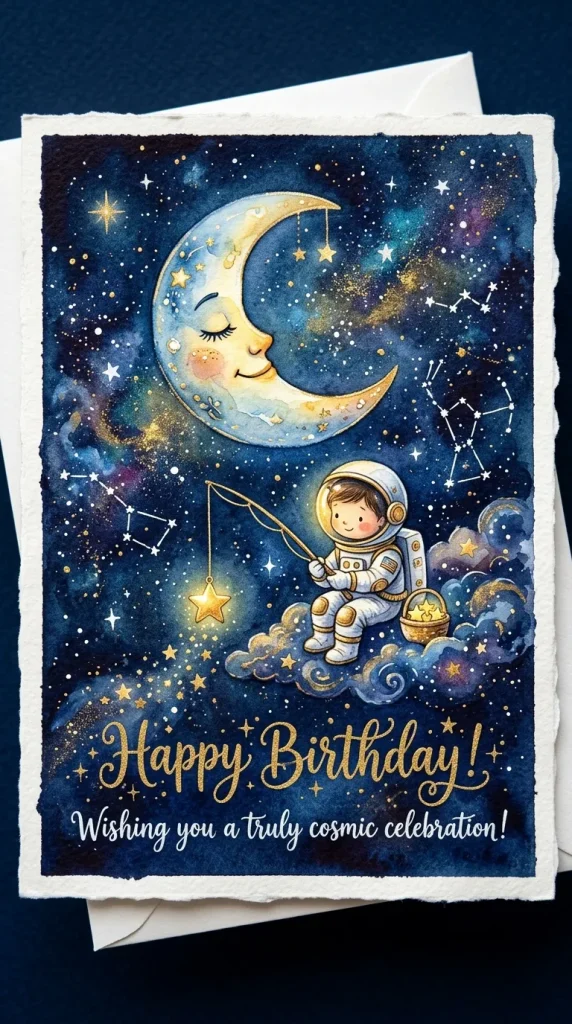
9. The Celestial “Love You to the Moon” Galaxy Card
A magical, dream-like illustration featuring a sweet, smiling crescent moon sleeping soundly amidst a swirling background of cosmic watercolors. A tiny, adventurous little astronaut or a soft bear sits on the tip of the moon, fishing for glowing, bright yellow metallic stars below.
- Who It Suits Best: Dreamers, stargazers, significant others, and children who are absolutely fascinated by outer space, magic, and cosmic wonder.
- Styling & Care Tips: Use a bright metallic gold gel pen or gold metallic watercolor paint to make the stars and moon outline glimmer brilliantly whenever the card is turned toward the light. Splatter a tiny bit of white acrylic paint across the dark background to mimic a dense field of distant, twinkling galaxies.
- Benefits: It pairs a profoundly sweet, loving emotional sentiment with a gorgeous, premium artistic background, making it sophisticated enough for adults while remaining undeniably cute.
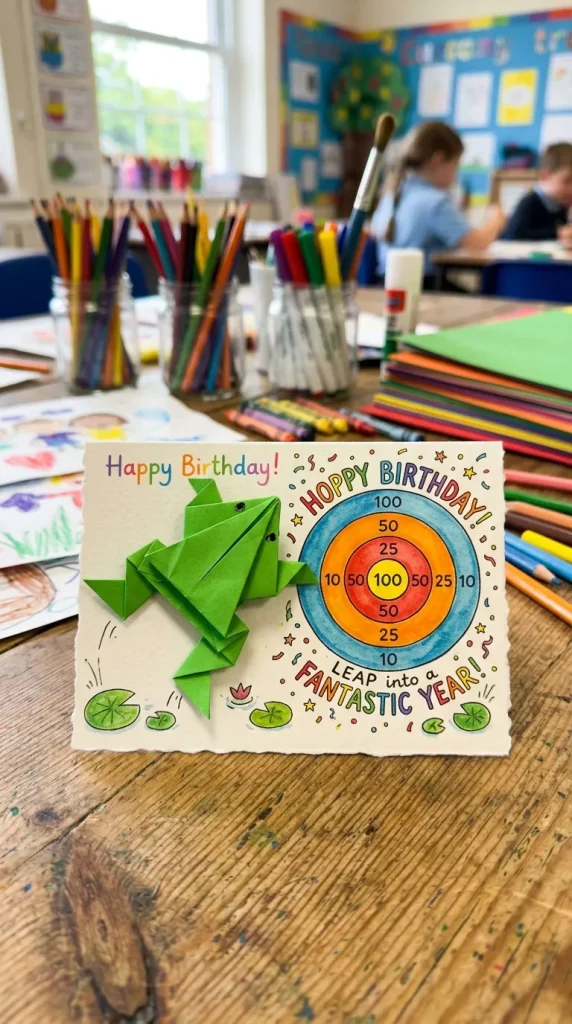
10. The Quirky Origami Jumping Frog Card
An incredibly fun, action-packed interactive greeting featuring a bright green paper frog folded using traditional origami techniques. Because of the accordion fold at its back legs, the little frog actually leaps across the room when the recipient gently presses down on its back!
- Who It Suits Best: Energetic kids, brothers, playful friends, and anyone who prefers action, games, and playful novelties over a traditional, quiet reading card.
- Styling & Care Tips: Fold your frog using a lightweight, vibrant double-sided green origami paper sheet so the folding lines remain sharp and the jumping spring mechanism retains maximum elasticity. Set up a little illustrated target bullseye circle inside the card interior for them to aim their frog toward.
- Benefits: It instantly turns card-opening into a funny, lighthearted birthday parlor game, ensuring your gift stands out as the most entertaining package of the entire day.
Pro Tips for Achieving a Polished Boutique Finish
To elevate your whimsical card concepts from looking like a basic weekend school project to a crisp, high-end piece of boutique stationery art, implement these expert crafting guidelines:
1. Invest in White Pigment Ink Pens: When drawing tiny faces or expressions on dark cardstock patterns (like the eyes of an avocado or details on a dark background), a high-quality white gel pen (like the Uni-ball Signo Broad) is invaluable. It allows you to add gorgeous, reflective white catchlights to character eyes, instantly making them look alive and full of emotion.
2. Clean Your Cut Edges with a Fine Nail File: If your paper cuts have tiny, jagged frays or fibers left behind by dull scissors, gently run a fine-grit emery board nail file along the edges of the cardstock. This instantly smooths the paper edges, leaving you with a perfectly clean, professional silhouette line.
3. Round Your Card Corners: A fantastic trick to make any handmade card look instantly manufactured by a luxury boutique is to round off the four outer corners of your card base. A simple hand-held corner rounder punch tool gives the card a soft, modern, and high-end aesthetic.
4. Keep Your Expressions Centered and Low: The secret formula to maximizing the “cute” or “kawaii” factor in any animal or object drawing is facial proportion. Always position the eyes and mouth low down on the body or face, and space the eyes relatively far apart. This layout mirrors baby facial proportions, which automatically triggers a warm, nurturing psychological reaction.
Common Mistakes to Steer Clear Of
- Using Standard Watery School Glue on Thin Paper: Applying a heavy stream of standard white liquid school glue to thin cardstock sheets causes the paper to absorb moisture unevenly. This results in unsightly rippling, bubbling, and warping. Always opt for dry double-sided tape runners, glue sticks, or specialized papercraft tape to maintain flat surfaces.
- Forgetting to Let Ink Gel Pens Dry Completely: Fast-drying gel pens can still smudge if you run your fingers across them immediately after writing. Give all your detailed hand-lettering, eye drawings, and border lines at least two full minutes of undisturbed resting time before moving or assembling the card panels.
- Overcrowding Your Layout Design: Trying to jam an adorable animal, a massive pun greeting, a mountain of sequins, and a patterned border all onto a tiny A2 card base creates visual chaos that dilutes the sweetness of your design. Embrace clean white space; a single cute character surrounded by open paper looks infinitely more impactful and professional.
Conclusion
Diving into cute birthday card ideas is a wonderfully joyful, creative way to step away from mass consumerism and give a gift filled with genuine personality, heart, and wit. From the smiling faces of the kawaii avocado duo to the playful leaps of the origami jumping frog, these projects show that a little bit of paper, color, and imagination can create a wonderful keepsake that will be smiled at for a long time.
The true magic of craft work is that perfection is never required. It is the slight, endearing imperfections—the hand-lettered text, the hand-cut paper lines—that tell the birthday person that you cared enough to dedicate your quiet time to making them feel loved. So gather your markers, select your favorite whimsical concept from our guide, and have fun creating a little paper magic today!
Which adorable birthday card concept are you going to create first? We would love to hear your thoughts in the comments section below. Share your lovely crafting stories and inspire our creative community!
Frequently Asked Questions (FAQs)
What pens are best for drawing tiny faces and lettering on handmade cards?
For crisp, rich black lines that never bleed or fade, look for pigment-based fine-liner pens such as Sakura Pigma Micron or Staedtler Pigment Liners. For smooth, vibrant color filling, alcohol-based dual-tip markers are excellent because they blend seamlessly without leaving behind harsh streaky stroke lines on your paper.
Can I mail a card with a 3D pom-pom or puffy paint safely through the post?
Yes, but you need to take a couple of basic precautions. If your card features a raised component like a plush yarn pom-pom or thick puffy paint, select a sturdy bubble-padded envelope instead of a thin paper one, and request your local post office to hand-cancel the stamp so it avoids heavy automated sorting machines.
How do I make my own custom colored ink spray for splattered backgrounds?
You can easily craft a gorgeous, shimmering mist spray by mixing a few drops of liquid water-based ink or fluid acrylic paint with clean water inside a small plastic fine-mist spray bottle. Add a tiny pinch of fine cosmetic mica powder or loose shimmer pigment, shake vigorously, and mist it gently over your card panels.
What cardstock weight is best to prevent cards from falling over when displayed?
For a solid, premium card base that stands upright beautifully on a mantelpiece without bending or collapsing under the weight of layers, look for cardstock labeled between 80lb cover weight (approx. 216gsm) and 110lb cover weight (approx. 300gsm). Anything lighter will feel like flimsy copy paper.
Leave a Reply