Looking for easy paper craft ideas? Discover 10 unique, stunning paper crafting projects for all skill levels with expert tips and step-by-step styling advice!
paper craft ideas, easy paper crafts, origami tutorial, paper quilling designs, 3d paper art, scrapbooking layouts, handmade card ideas
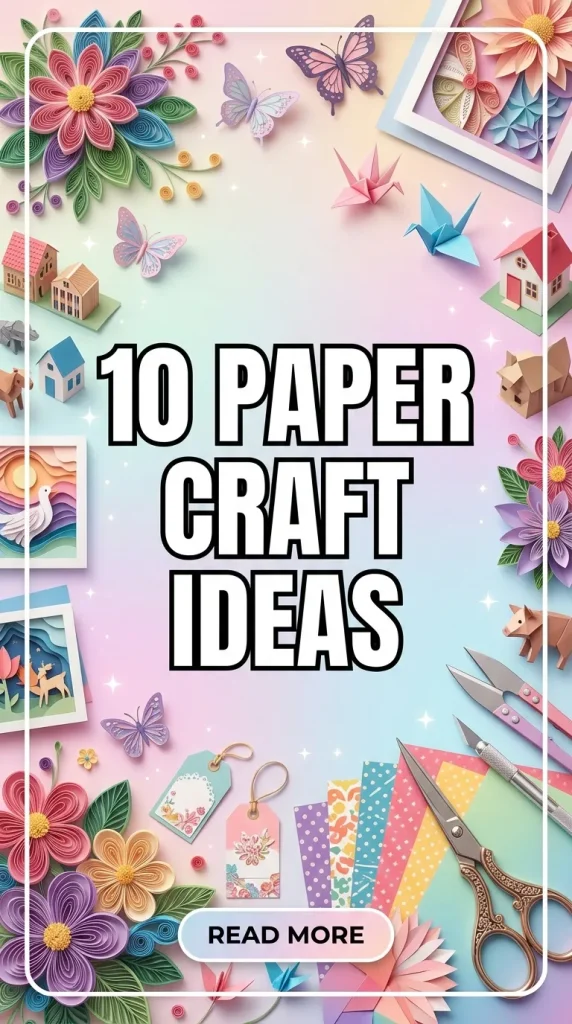
Unfolding Creativity: 10 Stunning Paper Craft Ideas to Transform Simple Sheets into Art
We have all looked at a blank piece of paper and seen nothing more than a tool for a to-do list, a bill, or a dull printer document. But for thousands of years, across different cultures worldwide, paper has served as one of the most expressive, dynamic, and therapeutic artistic mediums known to humanity. It is highly accessible, infinitely versatile, and surprisingly structural.
The problem is that diving into paper crafting often feels intimidating. When you look at high-end 3D paper sculptures, complex geometric origami, or microscopic paper quilling designs on social media, you assume you need specialized professional machinery, expensive boutique toolkits, or the steady hands of a surgeon. This design intimidation often leaves you stuck, relying on the same simple cut-out shapes or abandoning your creative impulses entirely.
The solution is much simpler than you think. You do not need an art degree or an industrial studio to create stunning visual pieces. By unlocking the right paper craft ideas, you can transform cheap, everyday paper stock into gorgeous home decor, heartfelt personal gifts, and interactive structural installations. Whether you are crafting alongside young kids on a rainy afternoon or curating intricate fine art for a gallery wall, this ultimate guide breaks down 10 innovative crafting styles, complete with professional construction tips, structural shortcuts, and damage-control rules to elevate your paper art journey today.
Quick Reference: Paper Craft Styles, Time, and Skill Level
Different types of paper art demand varying levels of precision, patience, and processing time. Use this comparison table to find a technique that aligns perfectly with your current schedule and crafting experience.
| Paper Craft Idea | Time Investment | Difficulty Level | Primary Structural Tool | Structural Longevity |
| The Modular Origami Star | 10–15 minutes | Easy | None (Precision folds) | Medium-High |
| Intricate Paper Quilling | 45–90 minutes | Medium-High | Slotted quilling tool | High (If sealed) |
| The 3D Layered Shadow Box | 30–60 minutes | Medium | Craft knife & foam tape | Exceptionally High |
| Crepe Paper Botanical Blooms | 20–30 minutes | Easy-Medium | Hot glue gun & floral wire | High |
| Symmetric Kirigami Cutouts | 5–10 minutes | Easy | Detail scissors | Medium |
10 Creative Paper Craft Ideas for Every Artistic Skill Level
(Note: Every crafter has a unique style preference and artistic comfort zone. Here are 10 distinct, highly rewarding paper crafting methodologies complete with tailored assembly tips, unique benefits, and specific profiles for whom they suit best.)
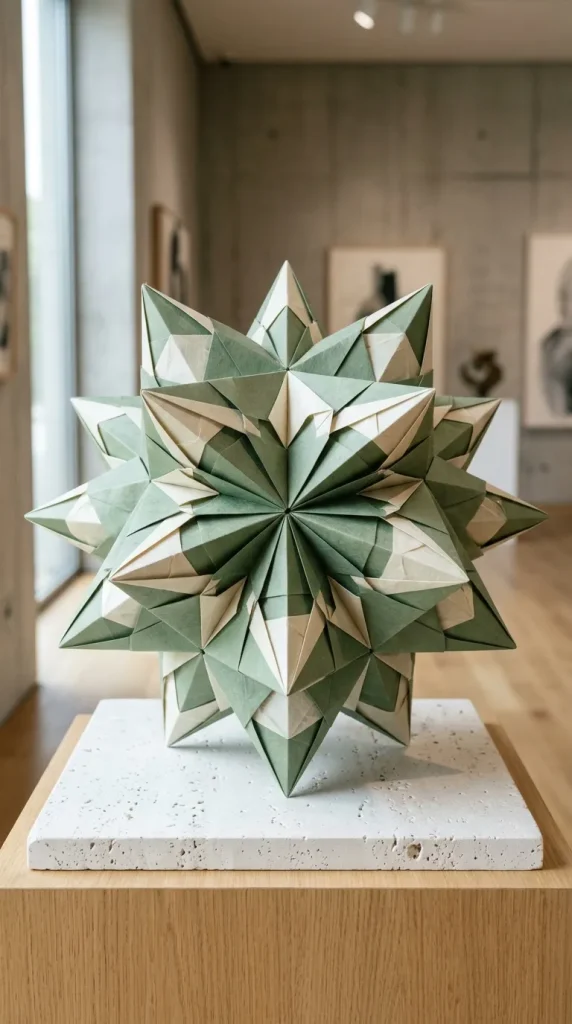
1. The Modular Geometric Origami Star
Origami is the ancient Japanese art of paper folding without the use of scissors, glue, or markings. While single-sheet origami is beautiful, modular origami involves folding multiple identical units of paper and interlocking them together to build complex, solid 3D structures.
- Description: A striking, multi-pointed three-dimensional star or polyhedral ornament assembled entirely by slipping the paper tabs of individual folded modules into the pockets of neighboring units.
- Who It Suits Best: Detail-oriented minds, math lovers, beginners seeking a clean structured project, and those looking for elegant, minimalist festive holiday ornaments.
- Styling & Assembly Tips: Use authentic square origami paper ($6 \times 6\text{ inches}$) with a crisp, matte finish. Avoid glossy or extra-thick paper, as it will resist holding sharp crease lines. Use a plastic bone folder tool to burnish every single fold, ensuring your modules interlock perfectly without slipping apart.
- Benefits: Requires absolutely zero glue or cutting tools, relies completely on structural friction, and improves spatial awareness and mindfulness through rhythmic folding patterns.
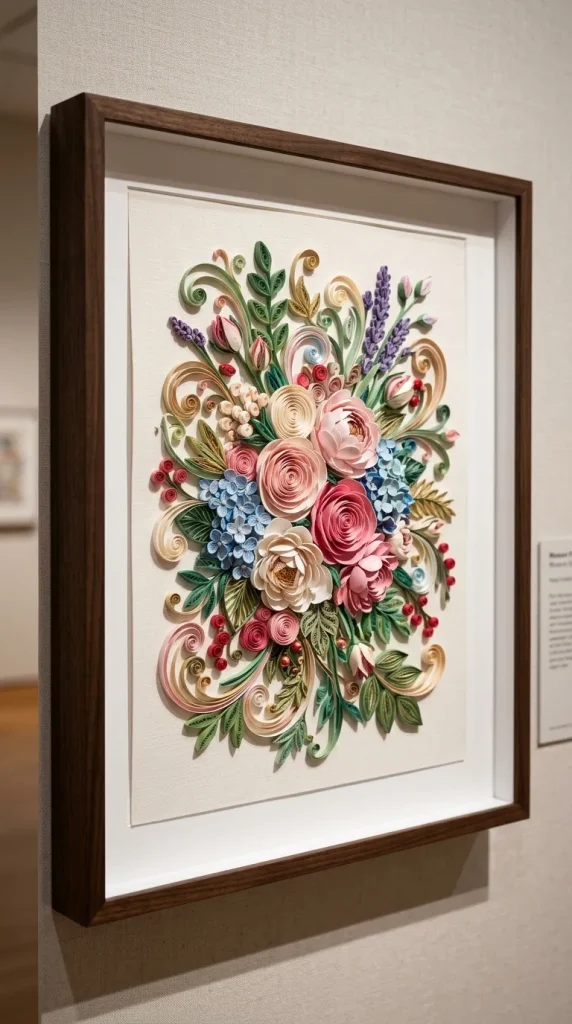
2. Fine-Art Paper Quilling Designs
Paper quilling, or paper filigree, involves coiling, rolling, shaping, and gluing narrow strips of paper together to create intricate, mosaic-like decorative designs that resemble fine filigree work.
- Description: A visually breathtaking arrangement of tight and loose paper coils shaped into teardrops, marquises, and scrolls, glued edge-wise onto a heavy cardstock background to form floral, animal, or typographic patterns.
- Who It Suits Best: Patient crafters, jewelry makers, fine-art enthusiasts, and anyone who enjoys working on intricate, miniature detailed projects over several sessions.
- Styling & Assembly Tips: Purchase pre-cut, acid-free quilling paper strips rather than trying to slice them yourself to maintain a perfectly uniform width (ideally $3\text{mm}$ or $5\text{mm}$). Use a fine slotted quilling needle to roll your coils tightly. Use a circle sizing template board to ensure your shapes expand to identical diameters before securing them with a tiny dot of clear PVA glue applied with a toothpick.
- Benefits: High market value as finished custom art, incredibly meditative to construct, and adds literal dimension and shadow play to framed walls.
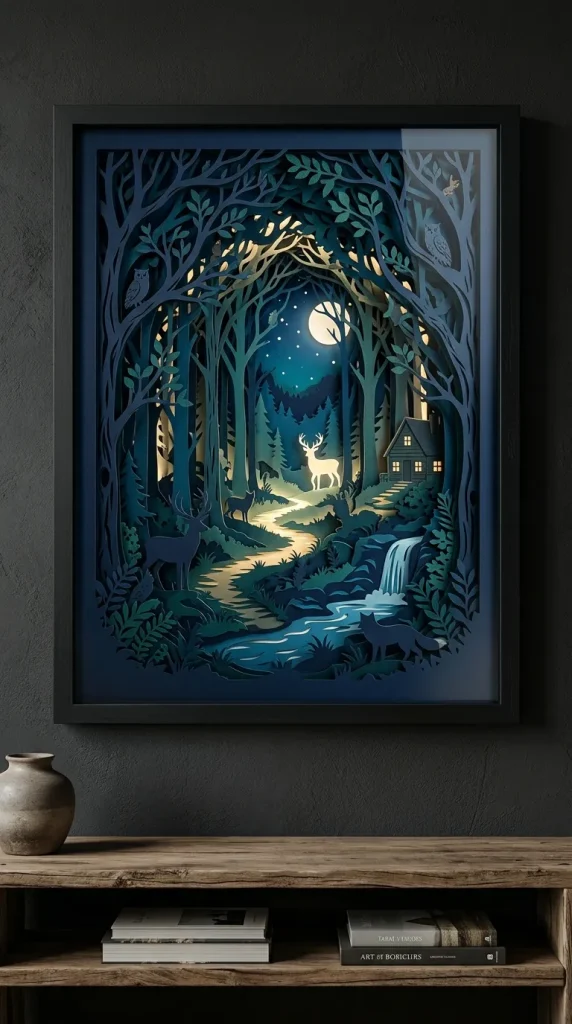
3. The 3D Layered Shadow Box Installation
By stacking multiple cut-out paper layers sequentially on top of each other with space in between, you can create a magical, deeply immersive miniature landscape that tells a story through depth and shadow.
- Description: A deep shadow box frame enclosing four to seven individual cardstock layers, where each sheet features an increasingly close-up scenic silhouette, mimicking natural physical depth.
- Who It Suits Best: Crafters who enjoy landscape design, fairy-tale aesthetics, or those utilizing desktop digital cutting machines (like a Cricut or Silhouette).
- Styling & Assembly Tips: Use heavy $65\text{lb}$ to $80\text{lb}$ cover weight cardstock so the delicate interior cutouts do not sag over time. Separate each cut-out sheet layer using thick, double-sided adhesive foam spacer dots or thin strips of foam board. For a truly magical finish, install a thin strip of battery-powered wireless LED fairy lights along the back frame to cast silhouettes forward.
- Benefits: Exceptionally high-end professional appearance, highly durable when enclosed behind glass, and creates an incredible dynamic focal point when lit at night.
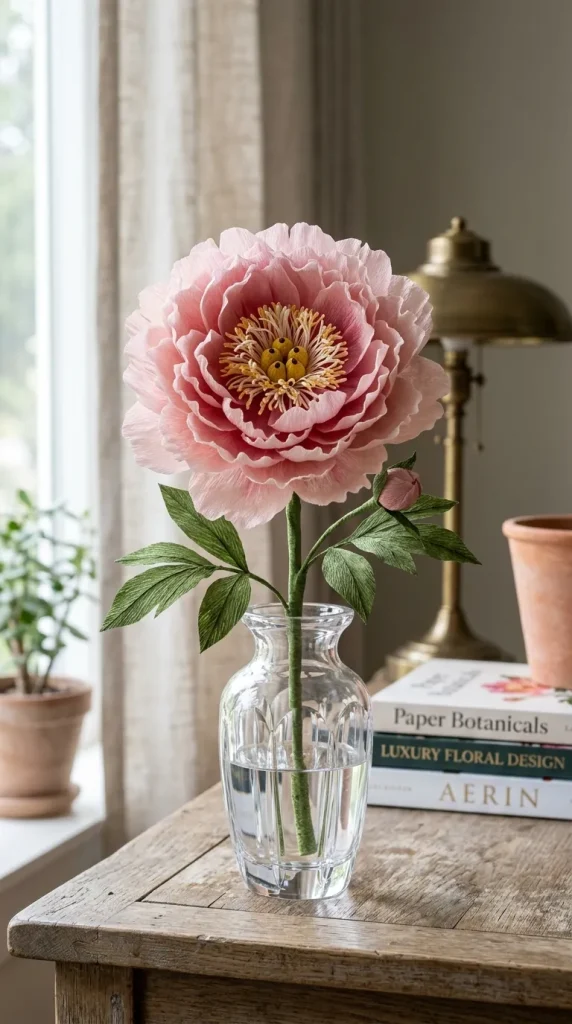
4. Hyper-Realistic Crepe Paper Botanical Blooms
Real flowers wither away in a week, but custom-crafted paper flora lasts forever. By manipulating high-grade crepe paper, you can capture the delicate ruffles, veins, and curves of authentic natural petals.
- Description: Exquisite, life-sized paper flowers—such as peonies, double-petal roses, or delicate Icelandic poppies—assembled by shaping individual crepe paper petals around a wire stem.
- Who It Suits Best: Biophilic design fans, home decorators, brides seeking durable wedding bouquets, and anyone who loves working with organic, fluid shapes.
- Styling & Assembly Tips: Invest in high-stretch heavy Italian or German crepe paper ($180\text{g}$ weight is ideal). Cut your petals along the natural grain line of the paper ridges. Use your thumbs to gently stretch and “cup” the center of each petal, curving the top edges backward with a round pencil to mimic authentic organic growth. Secure the base to a cloth-covered floral wire using quick-set hot glue.
- Benefits: Creates lightweight, allergy-free home accents; the paper stretches and molds like real organic tissue, offering unique sculptural flexibility.
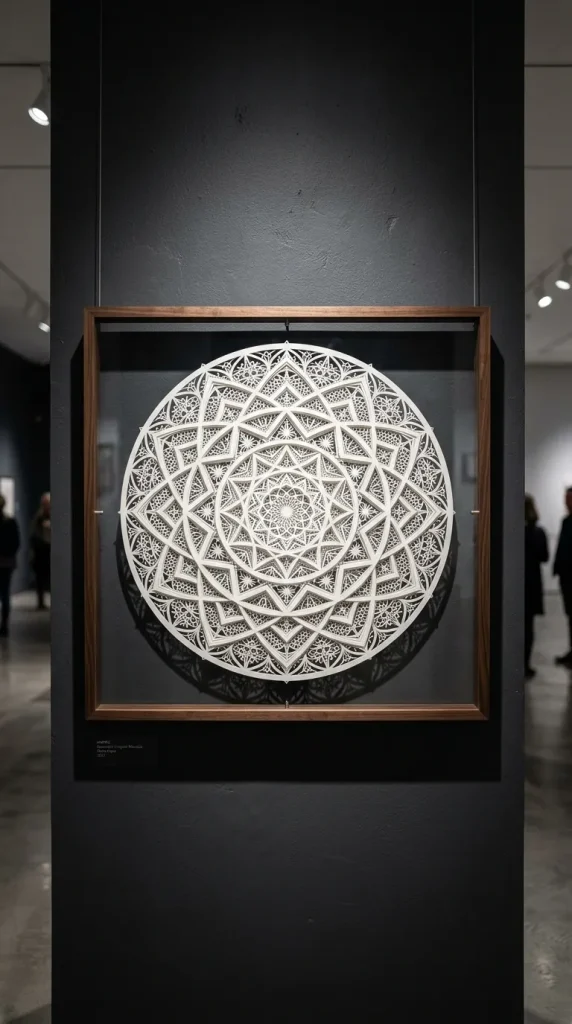
5. Intricate Symmetric Kirigami Window Panes
Kirigami is a direct cousin of origami that actively embraces both folding and cutting. Think of it as a highly elevated, structurally complex version of folding paper snowflakes, resulting in stunning architectural symmetry.
- Description: A flat sheet of paper folded symmetrically and sliced with precise geometric cuts that, when unfolded completely, reveals a mesmerizing, repetitive mandala or latticework pattern.
- Who It Suits Best: Fans of geometric design, paper cutting beginners, and children practicing fine motor control with precision scissors.
- Styling & Assembly Tips: Use lightweight $20\text{lb}$ text weight paper; if you use heavy cardstock, folding it multiple times will make it too thick to cut through accurately. Press your finished design under a heavy stack of textbooks overnight to flatten out the fold lines, then float it inside a transparent double-glass floating frame against a dark wall.
- Benefits: Instant dramatic visual results in under ten minutes, highly cost-effective, and works beautifully as faux stained-glass window treatments.
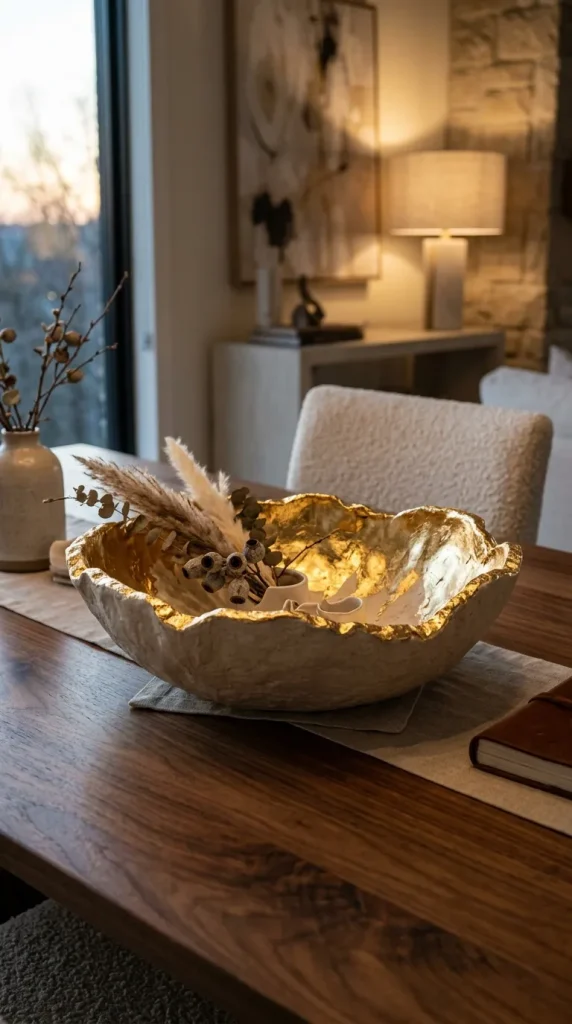
6. The Textured Papier-Mâché Sculptural Bowl
Papier-mâché is a classic casting technique that combines paper strips or shredded paper pulp with a liquid adhesive paste to build rigid, stone-like vessels and organic objects.
- Description: A rustic, earthy decorative bowl or tray constructed by layering damp, paste-soaked newspaper sheets or refined paper clay over a structural balloon or plastic mold.
- Who It Suits Best: Lovers of rustic, wabi-sabi, and organic modern home decor; tactile crafters who do not mind getting their hands messy.
- Styling & Assembly Tips: Mix two parts non-toxic white craft glue with one part warm water to create a strong, smooth casting paste. Apply at least four to six alternating layers of torn newspaper strips, letting each layer dry completely for 24 hours. Finish the dried vessel with a coat of textured chalk paint or dynamic gold-leaf gilding along the interior rim for a high-end luxury look.
- Benefits: Completely upcycles old newspapers or cardboard waste, creates incredibly sturdy lightweight home objects, and delivers a gorgeous ceramic-like appearance at zero cost.
7. Creative Scrapbooking Storytelling Layouts
Scrapbooking is the ultimate method for preserving personal family histories, combining photographs, journal entries, tickets, and textured paper layers into an artistic visual diary.
- Description: A highly personalized $12 \times 12\text{ inch}$ album page layout that frames meaningful personal photographs using patterned background paper, die-cuts, and pocket journaling cards.
- Who It Suits Best: Family historians, memory keepers, travelers, and anyone wanting to document life milestones beautifully.
- Styling & Assembly Tips: Always check that every adhesive, marker, and paper sheet you use is explicitly labeled “acid-free” and “lignin-free” to prevent your precious photographs from yellowing and deteriorating over time. Layer your papers using a mix of flat glue rollers and thin foam adhesive squares to create an engaging hierarchy of depth.
- Benefits: Preserves memories safely for generations, highly modular, and serves as an excellent creative outlet for left-over gift wrapping paper scraps.

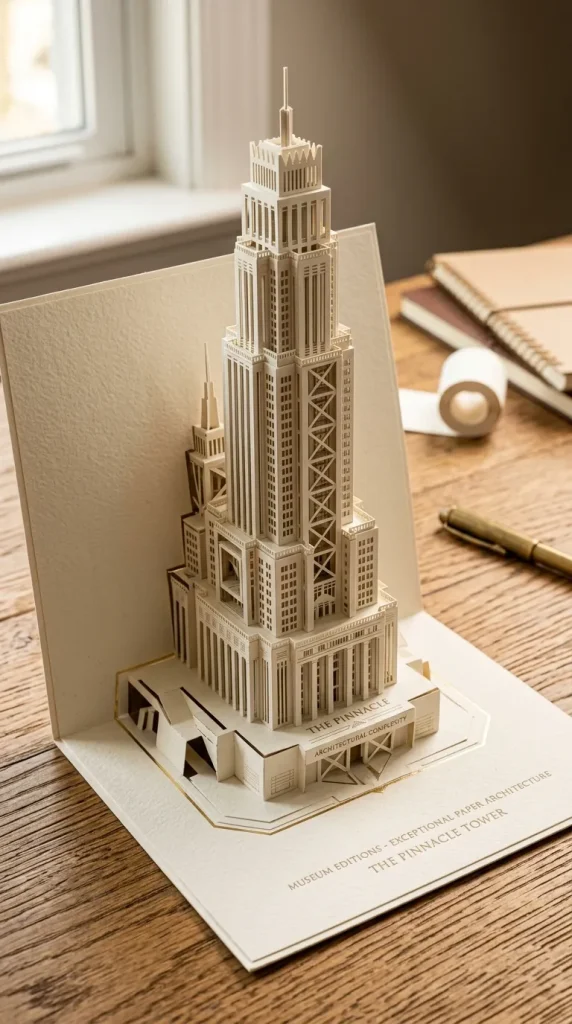
8. Structural Pop-Up Architecture Greeting Cards
Elevate your gifting experience by crafting an ordinary looking card front that explodes into a complex architectural skyscraper, bridge, or birthday cake when the receiver cracks open the fold.
- Description: An interactive card mechanism engineering system utilizing strategic box pleats, steps, and precise valley-and-mountain folds cut into a central spine to lift paper elements forward automatically.
- Who It Suits Best: Budding engineers, paper architects, card-makers, and fathers or kids who enjoy tactile, mechanical interactions.
- Styling & Assembly Tips: Map out your cutting guide on a scrap sheet of paper before slicing into your final premium stock. Use a scoring tool (or the blunt back edge of a butter knife) to pre-crease your fold lines perfectly. Keep your structural support columns at a perfect $90^\circ\text{ angle}$ relative to the central fold to ensure the card closes completely flat without bending internal elements.
- Benefits: High emotional impact on the recipient, interactive, and can be customized for any holiday, birthday, or celebration.
9. High-Contrast Paper-Cut Typography Wall Art
Make your personal philosophy or favorite inspiring quote stand out boldly on your office wall by hand-cutting typography directly out of a solid sheet of stark paper.
- Description: A minimalist, high-impact design where letters or positive silhouettes are meticulously carved out of a single sheet of paper using a swivel craft blade, creating a beautiful negative space pattern.
- Who It Suits Best: Minimalists, graphic design lovers, typographers, and detail-oriented crafters with steady patience.
- Styling & Assembly Tips: Print out your text mirrored on the backside of your final cutting cardstock so your printer’s ink lines remain completely hidden from the viewer. Always use a brand-new, ultra-sharp No. 11 craft blade; a dull blade will tear the fiber edges of the paper, ruining the clean lines. Frame the finished cut-out sheet over a bright, contrasting color base.
- Benefits: Looks incredibly crisp, sharp, and high-fashion; requires only one sheet of paper and a single cutting knife to complete.
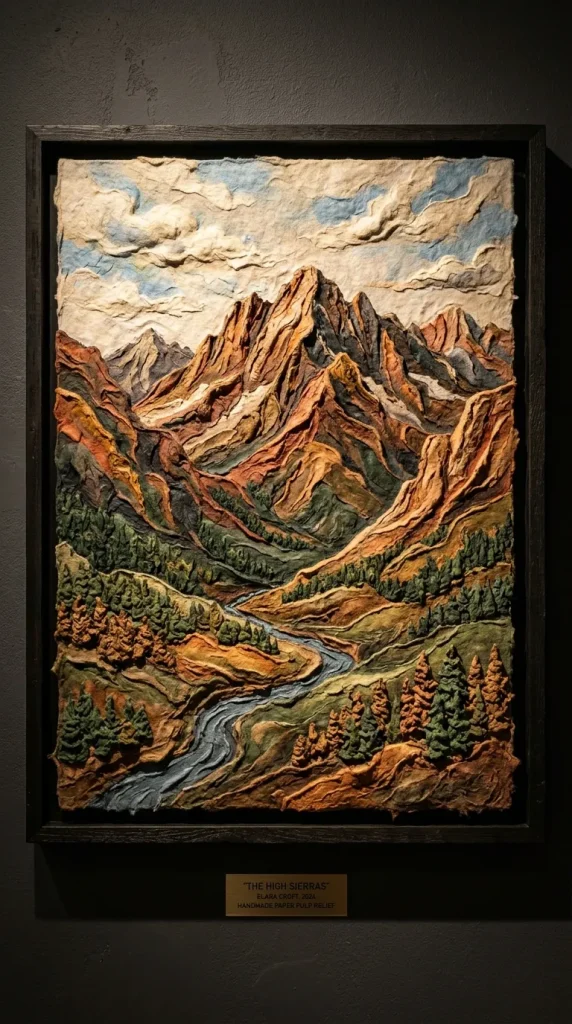
10. The Mosaic Paper-Pulp Painting
For an incredibly rich, tactile artistic experience, turn old egg cartons, cardboard boxes, and scrap paper into liquefied, colored paper pulp to mold a three-dimensional landscape painting.
- Description: A textured, canvas-like relief artwork made by blending paper scraps with water, mixing in acrylic paints, and painting or sculpting the colored pulp onto a rigid wooden panel.
- Who It Suits Best: Eco-conscious crafters, mixed-media artists, painters looking for deep physical texture, and children who love sensory tactile manipulation.
- Styling & Assembly Tips: Shred your scrap paper and soak it in boiling water for an hour before blending it into a smooth mush using an old kitchen blender. Squeeze out the excess water, stir in a generous spoonful of white liquid wood glue to bind it, and split into small bowls to mix in your chosen paint pigments. Apply the pulp using small palette knives or your fingers.
- Benefits: 100% eco-friendly and sustainable, diverts waste from landfills, and yields a dramatic heavy impasto texture that traditional liquid paint cannot replicate.
Pro Material Guide: Choosing the Right Weight and Texture
Using the incorrect type of paper for your specific craft is the fastest route to artistic frustration. Keep this professional interior design and crafting standard handy when shopping for supplies:
- Text Weight ($20\text{lb} – 28\text{lb}$): Standard printer paper, origami paper, and thin wrapping paper. Perfect for delicate, multi-layered geometric folds, kirigami, and projects requiring minimal bulk.
- Cardstock / Cover Weight ($65\text{lb} – 80\text{lb}$): Medium weight, structural craft paper. This is the ultimate baseline workhorse for paper crafting, ideal for 3D shadow boxes, scrapbook layouts, greeting cards, and pop-up mechanics.
- Heavy Cardstock ($100\text{lb} – 110\text{lb}+$): Thick, rigid material. Use this exclusively for heavy load-bearing structural card bases, boxes, or the main backing boards of dimensional art installations.
Common Paper Crafting Mistakes to Avoid
❌ Mistake 1: Relying on dull cutting tools. Trying to cut complex paper curves with a dull pair of household scissors or an old craft blade drags the paper fiber, leaving fuzzy, ragged, and torn edges. Change your blades often!
❌ Mistake 2: Over-saturating with liquid water-based glue. Squirting thick globs of standard school liquid glue onto thin paper introduces immense moisture, causing the paper fibers to expand unevenly, leading to permanent wrinkling, buckling, and warping. Use a dry tape runner or apply glue in microscopic dots using a toothpick.
❌ Mistake 3: Cutting against the natural grain direction. Paper has a grain direction based on how the fibers aligned during manufacturing. If you try to roll or loop a thick strip of cardstock against its natural grain line, the surface will crack and crease sharply rather than forming a smooth, flawless cylinder bend.
Frequently Asked Questions
What is the best glue to use for paper crafting?
For standard flat paper-to-paper joints, a high-quality dry adhesive tape runner is best because it adds zero moisture and cannot warp the paper. For dimensional construction, a fast-grabbing thick tacky gel glue or clear PVA glue works beautifully. For instant floral or 3D assembly, a low-temperature hot glue gun provides a reliable, rock-solid structural bond.
How do I protect and seal my finished paper crafts?
To protect your delicate paper creations from humidity, moisture, and dust accumulation, spray them with a few thin, even coats of an archival UV-resistant clear acrylic matte fixer spray. For a heavy, ceramic-like enamel shine on items like quilling jewelry or papier-mâché, apply a thin coat of liquid water-based gloss sealer (like Mod Podge).
Do I need an expensive electronic cutting machine to make 3D shadow boxes?
Not at all! While digital cutting electronic machines save immense time on high-volume production, a steady hand, a high-quality self-healing cutting mat, and a precision metal-handled craft knife allow you to carve out even more detailed, authentic, and unique human-centric cuts than a machine ever could.
Conclusion: Start Unfolding Your Masterpiece
At the end of the day, paper crafting is an invitation to slow down, step away from digital screens, and engage your hands in the deeply rewarding work of physical transformation. With just a simple stack of colored sheets, a sharp blade, and a few creative paper craft ideas, you have the power to breathe life, dimension, and beautiful storytelling patterns right into your home.
Take a look around your house today, track down a few sheets of scrap cardstock, choose a project from this list that speaks to your artistic soul, and start folding. Your next gorgeous visual masterpiece is just a crease away!