Have you ever stared at a blank, freshly frosted cake and completely frozen up? You want to create something beautiful, memorable, and unique for your next celebration, but the thought of intricate fondant sculpting or highly advanced floral piping makes you break out in a cold sweat. Traditional cake decorating can feel incredibly intimidating, time-consuming, and prone to messy failures.
You are not alone. Thousands of home bakers and professional decorators struggle to find that perfect balance between a design that looks high-end but doesn’t require a master’s degree in fine arts to execute.
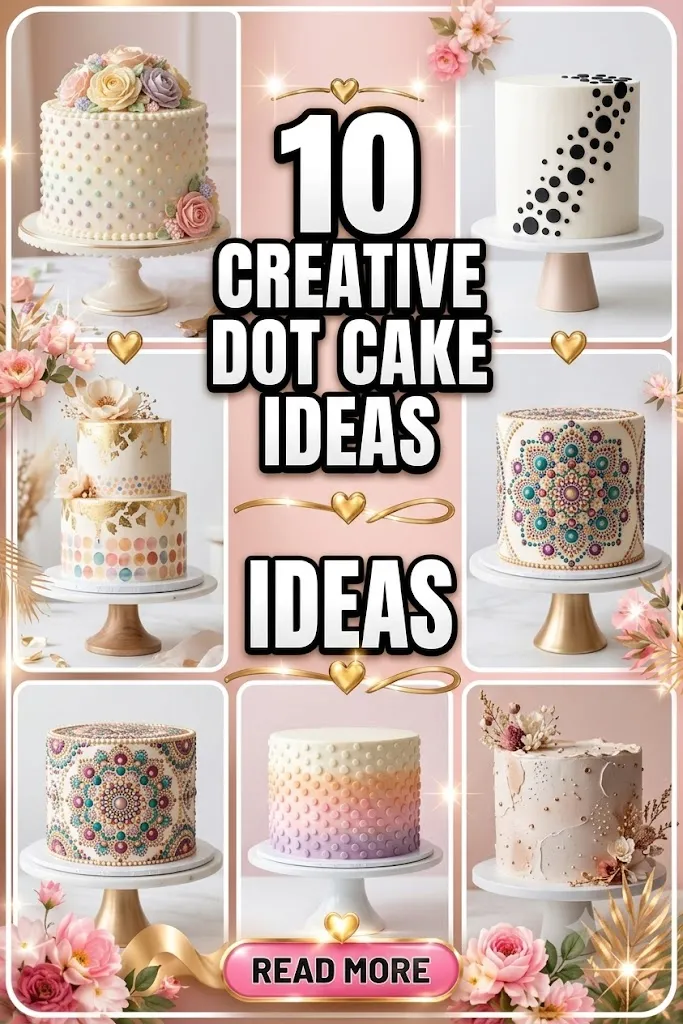
The ultimate, incredibly stylish solution? Dot cakes ideas.
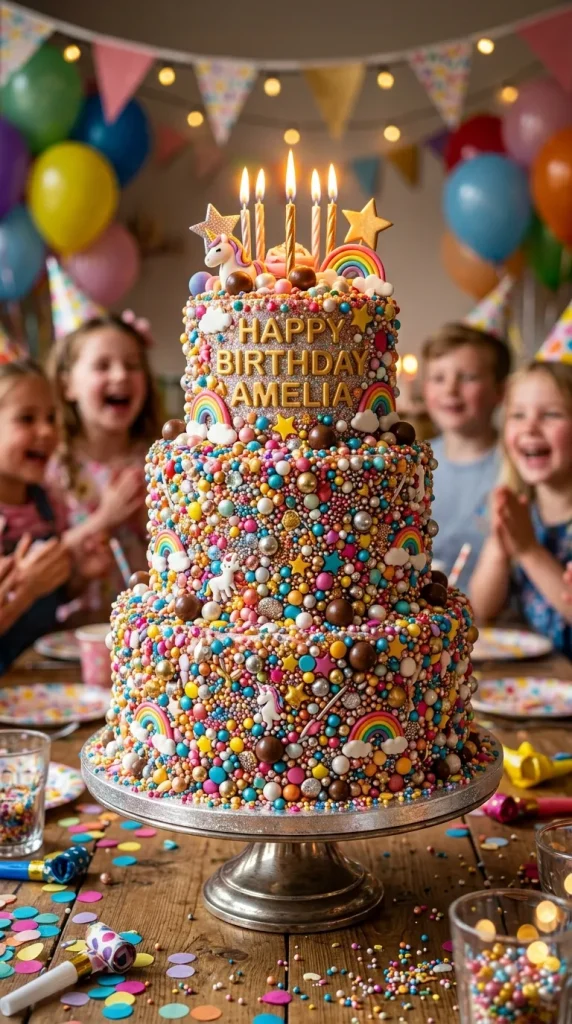
Dot cakes—ranging from retro, nostalgic polka dots and delicate vintage Swiss dots to mind-bending hidden surprise patterns inside the cake—are sweeping the baking world. They offer a clean, modern, and deeply satisfying aesthetic that can skew anywhere from whimsical and playful to deeply elegant. In this comprehensive guide, we will explore 10 incredible dot cake concepts, break down the exact piping tools you need, and share pro baking secrets to ensure your next dessert is the absolute talk of the party.
Why Dot Cakes Are Taking Over the Baking World
Before we dive into our master list of designs, let’s look at why dot-themed cakes are winning over the internet.
First, they are incredibly versatile. A single dot pattern can look like a playful retro dress from the 1950s, a sophisticated texture on a wedding cake, or a fun, colorful burst of confetti for a child’s birthday.
Second, the structural margin for error is much more forgiving than freehand script writing or painting on buttercream. With the right piping tips, consistent pressure, and a solid plan, anyone can achieve geometric perfection. It’s all about leveraging simple repetition to create a high-impact, professional visual effect.
10 Incredible Dot Cakes Ideas to Try for Your Next Party
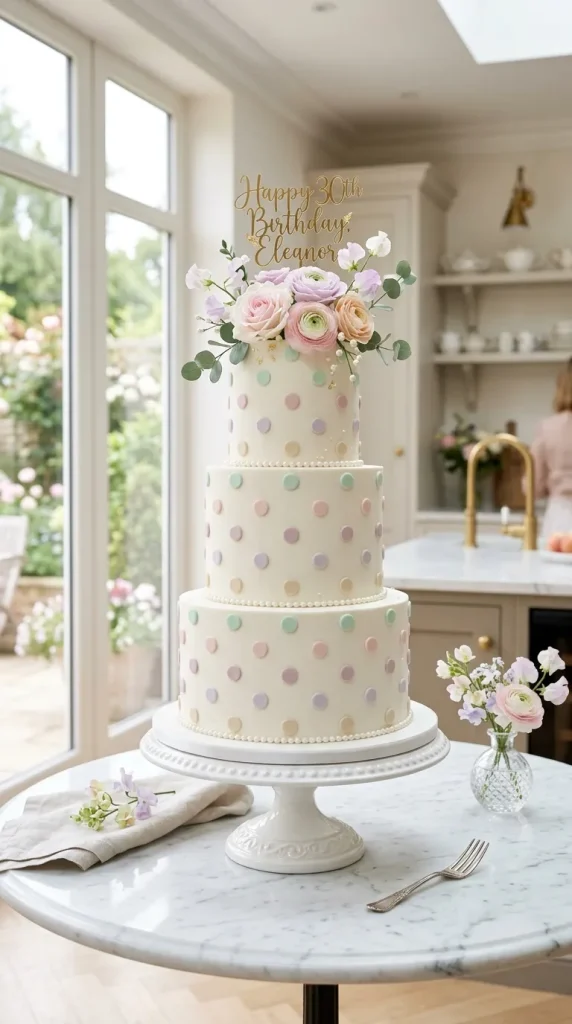
1. The Retro Pastel Polka Dot Cake
This design brings ultimate nostalgia to the table. It features a pristine, smooth pastel buttercream base decorated with perfectly spaced, oversized polka dots in contrasting soft shades like mint green, baby pink, and lavender.
- Who It Suits Best: Perfect for baby showers, retro-themed birthday parties, and bakers who want a clean, high-contrast look that isn’t overly busy.
- Baking & Decorating Tips: Use a circular cookie cutter or a small fondant plunger cutter to lightly stamp guide circles into your chilled base icing before piping. This keeps your spacing mathematically even.
- Benefits: Highly customizable with color palettes, universally loved by kids and adults, and looks beautiful on minimalist cake stands.
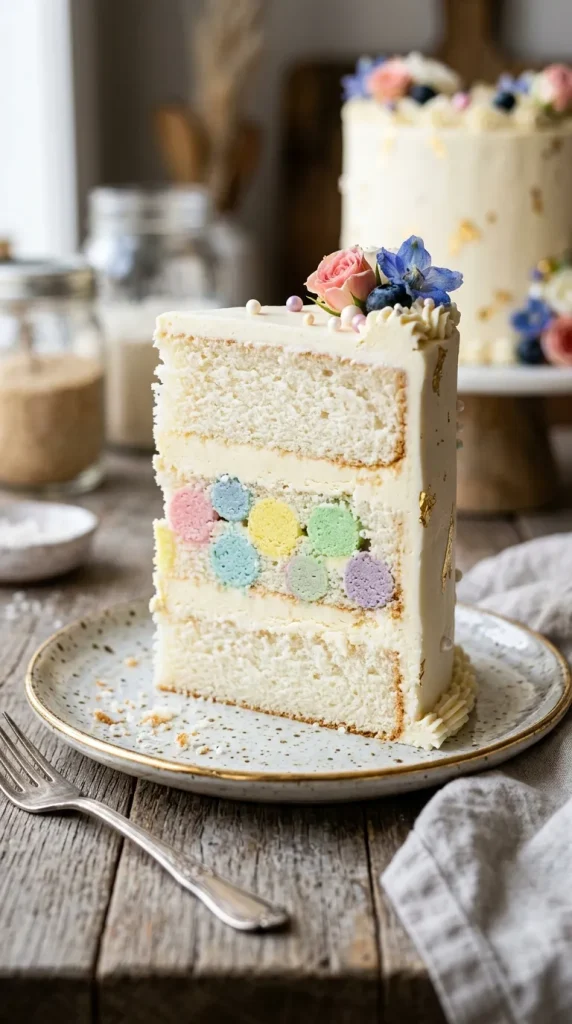
2. The Hidden Polka Dot Surprise Cake
The magic of this cake happens on the inside. When your guests cut a slice, they are greeted by perfect, solid colored cake balls baked right into contrasting layers of vanilla sponge, creating a stunning internal polka dot matrix.
- Who It Suits Best: Ideal for gender reveals, dramatic birthday surprises, and bakers looking to display true technical skill and “wow” factor.
- Baking & Decorating Tips: You will need to double-bake. Use a cake-pop maker or a silicone spherical mold to bake your colored dots first, freeze them, and then drop them into your raw vanilla cake batter before sending the whole pan into the oven.
- Benefits: Delivers a major element of surprise, makes for incredible social media video reveals, and allows you to experiment with fun flavor pairings.
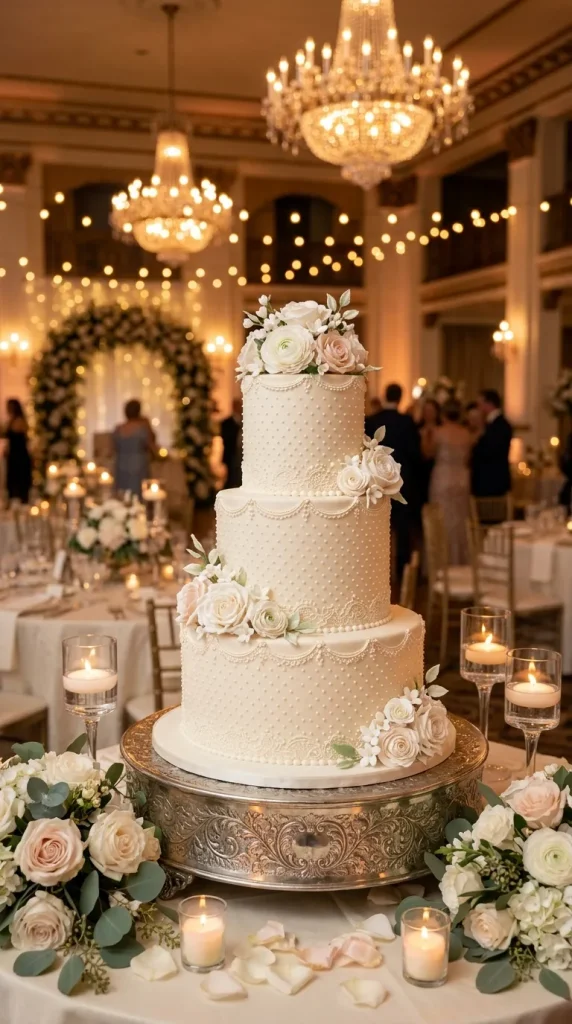
3. Elegant Wedding Swiss Dot Cake
Inspired by traditional Swiss dot fabric, this design features rows of tiny, delicate white-on-white or white-on-ivory dots piped across a smoothly frosted wedding cake. It looks incredibly intricate, luxurious, and classically beautiful.
- Who It Suits Best: Best for formal weddings, bridal showers, elegant anniversary dinners, and decorators with a steady hand.
- Baking & Decorating Tips: Use a very small round piping tip (such as an Ateco #2 or Wilton #3) and a stiff royal icing or a crusting buttercream. Pull the tip directly away from the cake quickly to avoid leaving long, messy “tails” on your dots.
- Benefits: Provides an expensive, high-end bridal look without the high cost of custom fondant stenciling, and pairs beautifully with fresh floral toppers.
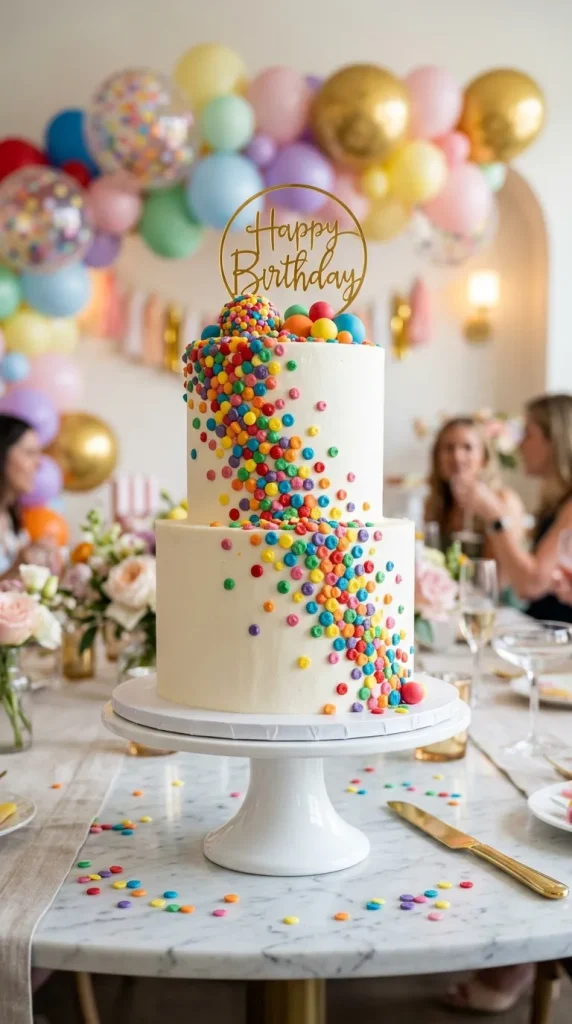
4. Vibrant Rainbow Confetti Cascade
A celebration of pure color! This layout uses multi-colored buttercream dots clustered tightly together at the top edge of the cake, which gradually scatter and thin out as they descend towards the base, mimicking a falling explosion of confetti.
- Who It Suits Best: Children’s birthdays, graduation parties, and beginners who want a stunning design that doesn’t require precise geometric spacing.
- Baking & Decorating Tips: Mix your buttercream into 5 to 7 bright, distinct colors. Fill small piping bags for each color, and alternate random placements as you work your way down the sides of the cake.
- Benefits: Very forgiving for beginners, hides any subtle imperfections in your base frosting layer, and instantly sets a festive mood.
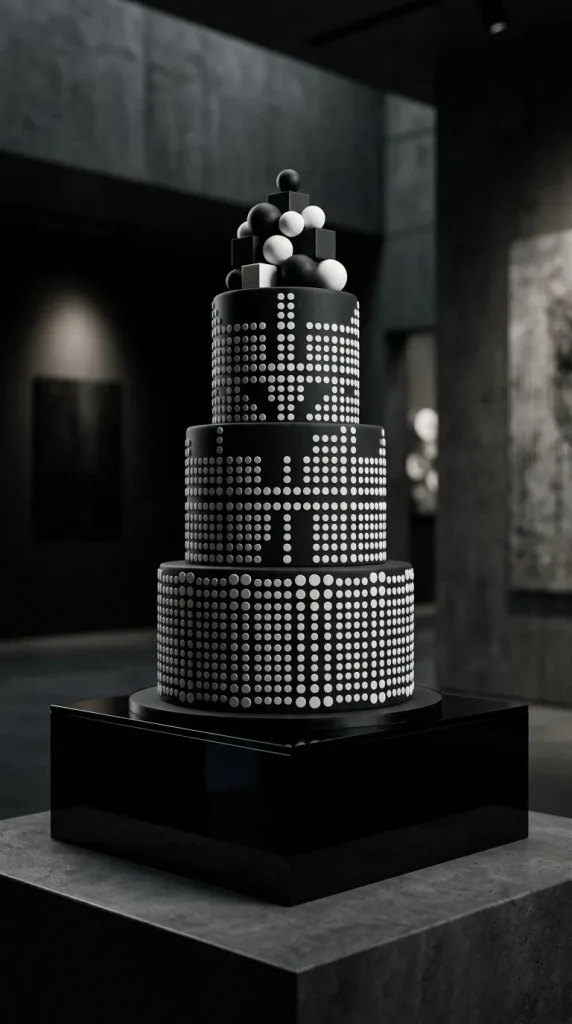
5. Chic Monochrome Fondant Dot Cake
A sleek, ultra-modern approach to cake design. This cake uses a crisp, sharp-edged fondant base (either deep black or bright white) adorned with flat, mathematically precise fondant discs in the exact opposite tone.
- Who It Suits Best: Modern art lovers, fashion-forward events, high-end corporate milestones, and decorators who love sharp, clean lines.
- Baking & Decorating Tips: Roll out your accent fondant thin and use a round piping tip as a punch-cutter to get perfectly matching, uniform flat dots. Adhere them to the cake with a microscopic dab of water or clear vanilla extract.
- Benefits: Offers a high-contrast, graphic design look, holds up incredibly well in warm indoor venues, and transports safely.
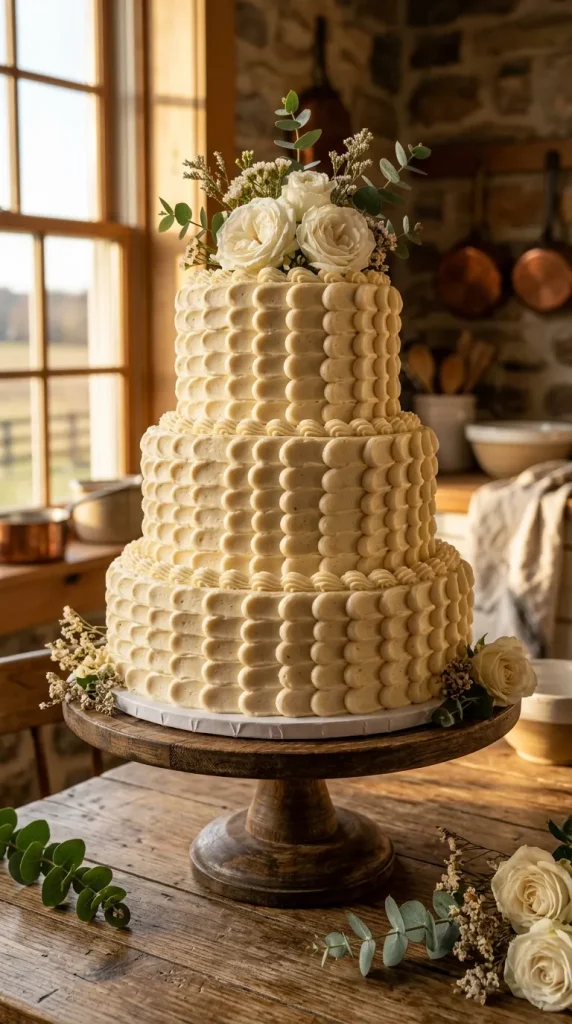
6. The Textured Buttercream Pull-Dot Cake
This technique uses a large round piping tip to create a vertical column of large buttercream dots. A small offset spatula or the back of a clean spoon is then pressed into each dot and dragged horizontally or vertically, creating a gorgeous, scalloped texture that looks like fish scales or woven fabric.
- Who It Suits Best: Bakers who want a rich, heavily textured finish that feels deeply satisfying to look at, great for rustic or bohemian gatherings.
- Baking & Decorating Tips: Consistency of your frosting is everything here. Your buttercream must be soft enough to smooth out easily when pulled, but stiff enough to hold the scalloped ridges without flattening.
- Benefits: Looks highly complex but relies on one simple, easily repeatable mechanical motion; hides uneven cake layers beneath a thick, delicious blanket of frosting.
7. Metallic Gold and Silver Luxury Dots
Bring red-carpet glamour to your dessert table. This cake features a moody, dark-colored base frosting (like navy blue, emerald green, or rich charcoal) dotted with varying sizes of shimmering metallic gold or silver paint drops.
- Who It Suits Best: New Year’s Eve parties, milestone adult birthdays (like a 30th or 50th), and luxury evening events.
- Baking & Decorating Tips: Pipe your dots using a plain white crusting buttercream first. Once they dry and form a slight skin, use a fine-tipped food-safe paintbrush to coat them in a mixture of edible metallic luster dust and a drop of high-proof clear alcohol.
- Benefits: Looks incredibly expensive, stands out brilliantly under party venue lighting, and adds a touch of high-end fine art to your table.

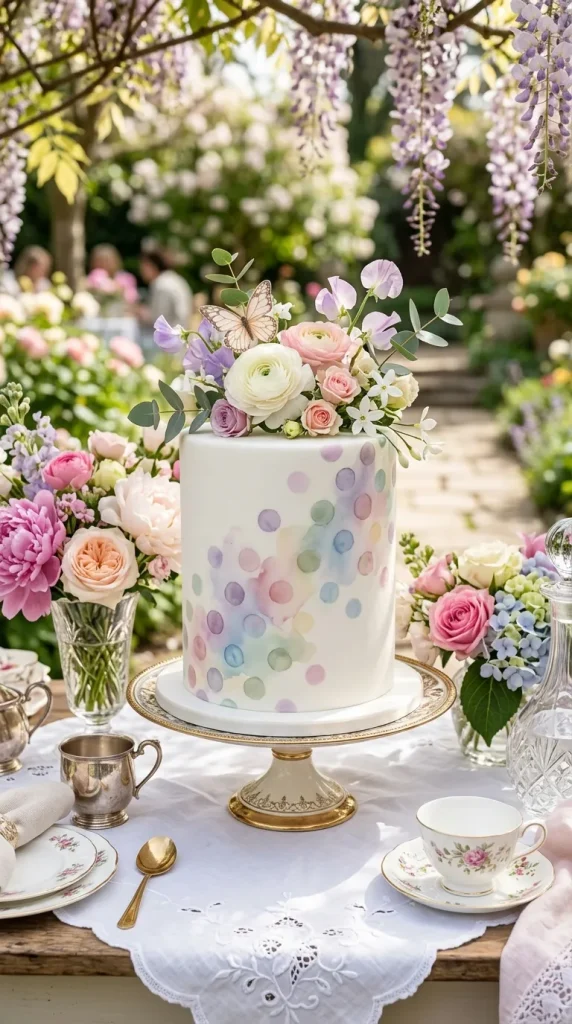
8. Whimsical Watercolor Painted Dots
Instead of dimensional piping, this style turns the cake into a canvas. Using gel food coloring mixed with a little clear extract, the decorator paints soft, translucent circles onto a chilled white fondant or buttercream canvas, letting the colors bleed slightly into one another like real watercolors.
- Who It Suits Best: Spring garden parties, artistic souls, bridal teas, and bakers who enjoy hand-painting and watercolor aesthetics.
- Baking & Decorating Tips: Keep your paintbrush damp, not dripping wet. Dab excess liquid onto a paper towel before touching the cake to prevent the food dye from running down the sides of your pristine frosting.
- Benefits: Entirely unique every single time, uses very little heavy frosting, and creates an artistic, delicate presentation.
9. Gradient Ombré Dot Matrix
This highly organized design utilizes rows of neat dots that transition smoothly from a dark shade at the bottom of the cake to a pale, almost-white shade at the top. The dots form a beautiful, clean gradient grid.
- Who It Suits Best: Lovers of clean symmetry, graphic designers, and elegant color-themed events.
- Baking & Decorating Tips: Make one large batch of colored buttercream for your bottom row. To make the subsequent rows, simply mix a measured amount of plain white buttercream into your remaining base color to lighten it step-by-step.
- Benefits: Visually soothing and balanced, highly photographic, and an excellent way to practice precision piping control.

10. The Abstract Sprinkles and Nonpareils Dot Bomb
For the ultimate texture lover, this design uses varying sizes of edible nonpareils, jumbo pearl sprinkles, and round chocolate dragees pressed deliberately into the cake surface to form an abstract, glittering constellation of hard and soft textures.
- Who It Suits Best: Kids’ birthday parties, fun casual events, and fast-moving decorators who want immediate, shiny results without mixing multiple bowls of colored icing.
- Baking & Decorating Tips: Apply your sprinkle dots immediately after frosting the cake while the buttercream is still sticky. Once the frosting sets or crusts, the sprinkles will no longer adhere smoothly.
- Benefits: Provides a satisfying crunch texturally, requires zero complex color mixing, and gleams brilliantly in photos.
Technical Comparison of Dot Cake Designs
To help you decide which project fits your current baking schedule and skill comfort zone, look over this detailed breakdown of installation times, technical difficulty, and structural maintenance:
| Dot Cake Design Style | Assembly & Decorating Time | Technical Difficulty | Structural Upkeep |
|---|---|---|---|
| Retro Pastel Polka Dot | 1.5–2 Hours | Low-Medium | Low (Very Stable) |
| Hidden Surprise Cake | 3.5–5 Hours | High (Double-Bake) | Medium |
| Elegant Swiss Dot | 2–3 Hours | Medium-High (Steady) | Low |
| Rainbow Confetti Cascade | 1–1.5 Hours | Low (Great for Beginners) | Low |
| Monochrome Fondant Dot | 2–2.5 Hours | Medium | Very Low (Room Temp) |
| Textured Pull-Dot | 1.5–2 Hours | Medium | Low |
| Metallic Luxury Dots | 2.5–3.5 Hours | High (Hand-Painted) | Medium (Avoid Touching) |
| Watercolor Painted Dots | 2–3 Hours | Medium-High | Low |
| Ombré Dot Matrix | 2–2.5 Hours | Medium | Low |
| Abstract Sprinkles Bomb | 1 Hour | Low | Low |
Pro Tips for Achieving Flawless Dot Patterns
Creating beautiful dot designs comes down to mastering your medium and controlling your tools. Use these expert guidelines to get clean, professional results every time:
💡 The Golden Rules of Cake Dotting
- Master Your Frosting Consistency: Your icing should be smooth, medium-stiff, and completely free of air pockets. Air bubbles in your piping bag will cause your dots to “pop” and leave jagged, deflated craters mid-pipe. Beat your buttercream on low speed for 5 minutes before loading your bag to smooth it out.
- The 90-Degree Angle Rule: Always hold your piping bag at a strict 90-degree angle (perpendicular) to the surface of the cake. If you tilt the bag, your dots will look like oblong raindrops instead of perfect geometric circles.
- Fixing the Tips: If your dots leave behind pointy, sharp Hershey-kiss tails, don’t panic. Let the icing crust or chill in the fridge for 15 minutes, then lightly press the points flat using a clean finger dipped in a tiny bit of cornstarch or clear water.
Common Mistakes to Avoid
- Piping on Warm, Fresh Cakes: If your cake layers aren’t completely chilled, your base frosting will slide, and your beautiful dots will melt and sag out of alignment. Always give your cake a solid 2 hours in the fridge before piping details.
- Inconsistent Squeeze Pressure: Squeezing the piping bag unevenly will give you an array of mismatched, chaotic dot sizes. Practice your rhythm and pressure on a sheet of parchment paper before bringing the bag to your actual cake.
- Using Too Much Liquid in Edible Paints: When mixing luster dust for metallic or watercolor dots, adding too much alcohol or extract will make the paint watery. It will dissolve your base buttercream and leave messy, bleeding streaks down the side of your hard work.
Summary and Final Thoughts
Dot cakes ideas prove that you don’t need years of advanced sculpture training to create a breathtaking, show-stopping dessert. By mastering a few simple piping mechanics, managing your tool angles, and choosing a brilliant color palette, you can easily elevate a basic cake into a professional masterpiece. Whether you choose the complex internal magic of a Hidden Surprise cake or the swift, playful joy of a Confetti Cascade, the dot design framework gives you maximum artistic freedom with structural peace of mind.
Get your piping bags ready, map out your colors, and step into your kitchen with absolute confidence!
Which of these dot cakes ideas are you going to try for your next big baking project? Let us know in the comments below, and make sure to save this guide to your favorite recipe board!
Frequently Asked Questions (FAQs)
1. What type of icing is best for piping dots on a cake?
A medium-stiff American buttercream, swiss meringue buttercream, or royal icing works best. The key is using an icing that holds its shape well at room temperature and doesn’t run. Avoid loose whipped creams or soft cream cheese frostings for intricate dotting patterns, as they tend to slump over time.
2. How do I keep my rows of dots perfectly straight around a round cake?
The easiest trick is using a clean sewing tape measure or an adjustable cake marker tool. Lightly press a clean ruler or toothpick into your crumb-coated or frosted cake at set intervals around the perimeter, making tiny pinpoint marks to serve as your leveling grid line before you start piping.
3. Can I use fondant instead of buttercream to make the dots?
Absolutely! Fondant is fantastic for achieving completely flat, sharp-edged modern dots. Simply roll your colored fondant thin, punch out your discs with small round cutters, let them dry slightly so they don’t stretch, and attach them to a fondant-covered or chilled buttercream cake with a tiny brush of water.
4. Why are my buttercream dots falling off the side of my cake?
This usually happens if your base cake frosting has already crusted over completely or dried out in the fridge, preventing the new piped dot from gripping onto the surface. For best adhesion, pipe your dot accents shortly after applying your final smooth coat of frosting, or ensure you press into the surface lightly while squeezing out the dot.