Refresh your home on a budget! Discover 10 unique DIY wall decor ideas, expert crafting tips, and step-by-step tutorials for gorgeous accent walls.
diy wall decor ideas, handmade wall art, budget room transformation, canvas painting hacks, hanging yarn macrame, geometric accent walls
We have all been there. You walk into a room in your home, look at a vast, empty expanse of plain drywall, and feel a sudden wave of uninspired boredom. Blank walls can make an entire house feel cold, unfinished, and completely devoid of personality. You want a home that tells a story, sparks conversation, and feels like a luxurious cozy sanctuary—but boutique metal art, gallery-framed prints, and custom installations can easily cost a small fortune.
The ultimate secret to high-end home staging on a shoestring budget is mastering clever, beautiful diy wall decor ideas.
Taking interior design into your own hands is an incredibly empowering experience. By combining everyday materials like canvas panels, yarn, wooden scraps, or even dried botanicals, you can craft magnificent focal points tailored precisely to your home’s color scheme. You don’t need a degree in fine arts or an expensive workshop filled with power tools to achieve professional results. All it takes is a little inspiration, the right execution strategy, and a free weekend.
In this ultimate home decor guide, we will break down 10 unique, trending diy wall decor ideas that will breathe instant life, texture, and dimension into your living space. From minimalist modern accents to rich bohemian tapestries, you will find the perfect weekend project to upgrade your blank canvas into a design masterpiece.
Why Handmade Wall Art Changes Your Whole Home
Before picking up your paintbrush or hot glue gun, let’s explore why personalized wall installments are far superior to mass-produced store prints:
- Flawless Color Matching: When you build it yourself, you can pull exact paint swatches from your existing rug, throw pillows, or couch fabric for a perfectly cohesive room flow.
- Acoustic Softening: Large, empty rooms suffer from tiny echoes. Fabric, wood, and yarn-based wall decorations naturally absorb sound waves, making your room feel instantly warmer and quieter.
- Deep Personal Storytelling: Every time a guest asks where you bought your striking new living room statement piece, you get to share the rewarding story of how you created it.
Let’s dive into our top 10 diy wall decor ideas to upgrade your home today.
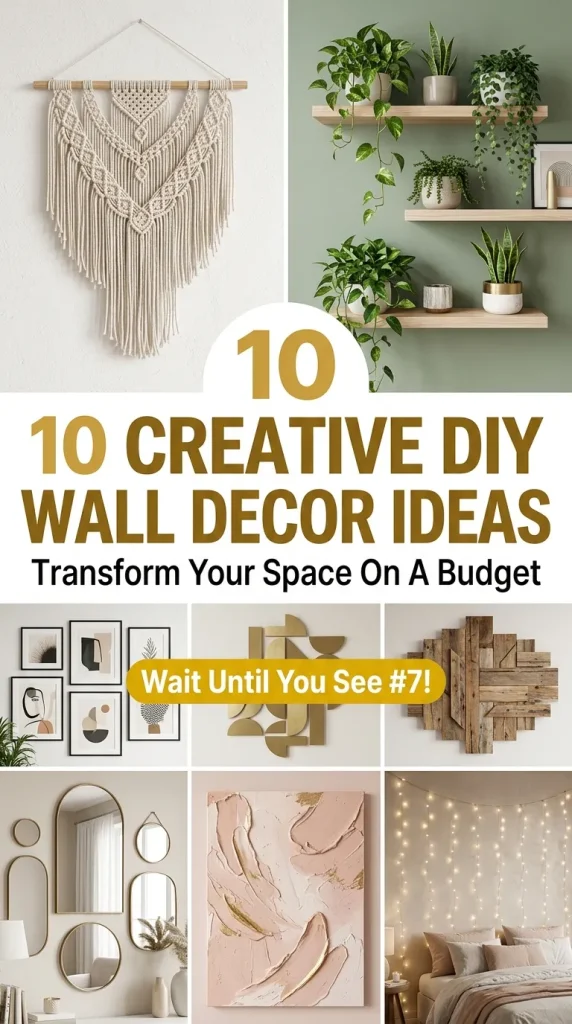
10 Genius DIY Wall Decor Ideas to Refresh Your Living Space
1. The Textured Minimalist Plaster Canvas
Taking the high-end interior design world by storm, this monochrome style uses joint compound or plaster spread across a large canvas to create striking, three-dimensional ripples, waves, or abstract geometric ridges.
- Who It Suits Best: Lovers of Scandinavian minimalism, mid-century modern aesthetics, and anyone who wants a luxurious, gallery-worthy look without intricate drawing skills.
- Styling Tips: Use a plastic notched tiling trowel or a wide-tooth comb to scrape perfect, uniform waves into the wet plaster. Once dried completely, spray the canvas with a flat matte chalk paint to give it an expensive, stone-like texture.
- Benefits: Delivers immense high-end visual depth under directional lighting, costs less than fifteen dollars to make, and masks any lack of traditional artistic painting skill.

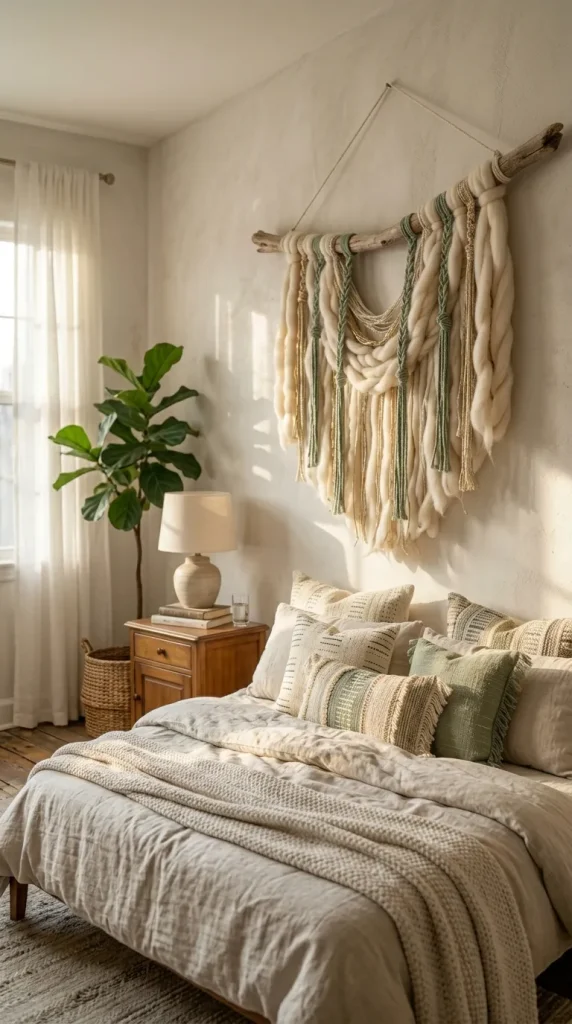
2. The Bohemian Floating Yarn Garland
This elegant textile project involves looping multiple strands of thick, textured macrame yarns, wool roving, and metallic threads over a clean wooden dowel or a rustic piece of salvaged forest driftwood, creating a soft, cascading fringe statement piece.
- Who It Suits Best: Anyone looking to add cozy texture to a cold bedroom, renters who need lightweight art that hangs on small damage-free hooks, and bohemian design enthusiasts.
- Styling Tips: Mix different yarn weights, from ultra-chunky merino wool to thin metallic gold strings. Use a sharp pair of fabric shears to cut the bottom of the hanging yarn into a precise chevron V-shape or a dramatic asymmetrical angle.
- Benefits: Softens the room’s acoustics naturally, provides beautiful movement, and fills massive vertical wall spaces without adding dangerous structural weight.
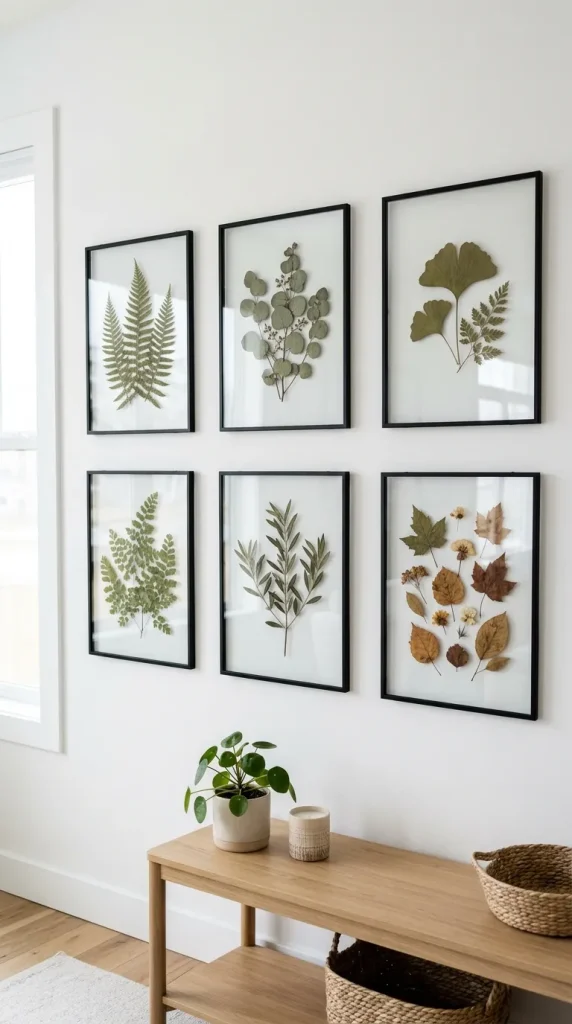
3. The 3D Pressed Botanical Gallery Wall
Bring the timeless beauty of the outdoors inside. This project involves collecting striking leaves (like ferns, eucalyptus, or monstera) or seasonal wildflowers, drying them flat inside a heavy book, and mounting them between clear glass floating frames.
- Who It Suits Best: Nature lovers, cottagecore fans, and decorators who want an elegant, organic display over a sofa, hallway, or entryway table.
- Styling Tips: Brush a very thin layer of clear acid-free PVA glue to the back of the dried leaf to anchor it to the glass pane before closing the frame. This stops the delicate botanical specimen from sliding down over time.
- Benefits: Brings calming natural green tones into your indoor space, uses completely free raw materials sourced straight from your garden, and offers a beautiful vintage aesthetic.
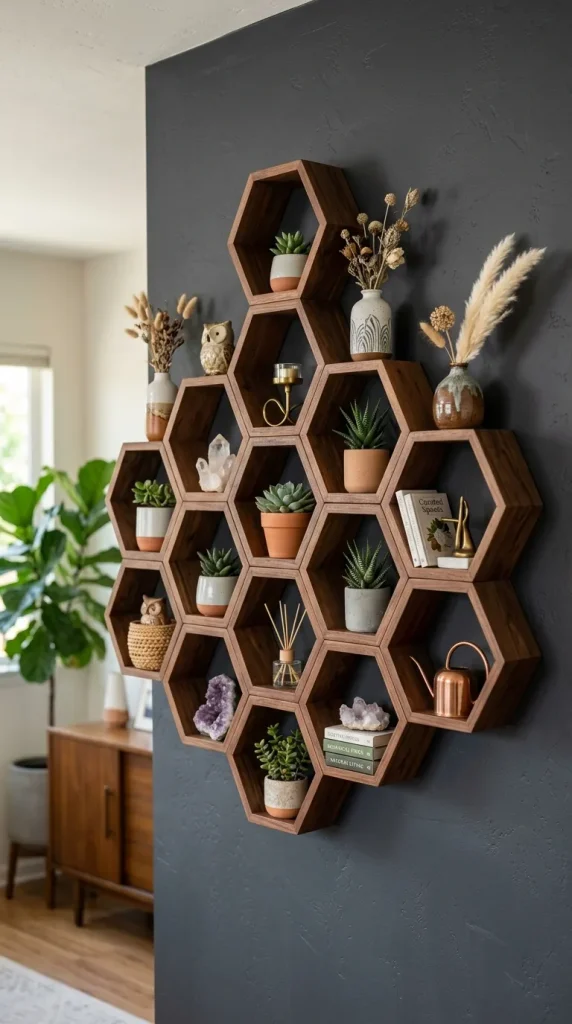
4. The Hexagonal Wooden Scrap Honeycomb Shelves
By cutting small, identical lengths of wooden craft boards at precise 30-degree angles and gluing them together into interconnected hexagons, you can mount a gorgeous shadow-box display for crystals, air plants, and small trinkets.
- Who It Suits Best: Intermediate crafters who enjoy geometric layouts, rustic farmhouse aesthetics, and functional, space-saving wall storage solutions.
- Styling Tips: Use a wood stain pen to color the interior of the honeycomb cells a deep walnut shade while painting the outer edges a bright crisp white to create a modern, high-contrast look.
- Benefits: Acts simultaneously as stunning architectural wall art and strong structural storage shelving for small lightweight decor pieces.
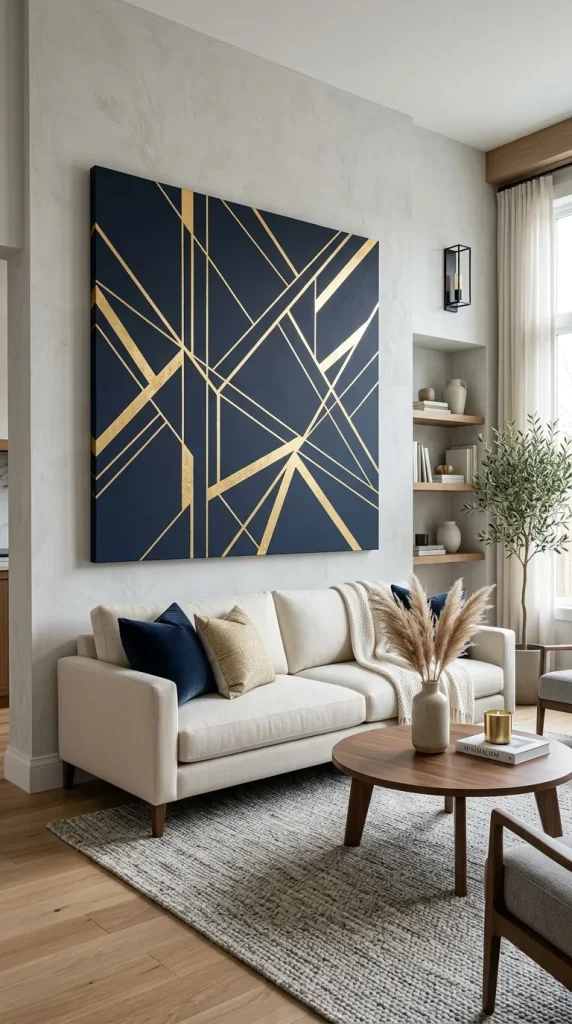
5. The Metallic Abstract Graphic Line Canvas
An excellent project for utilizing large-format blank canvases. Paint the entire background a solid, sophisticated hue like deep charcoal or muted olive, then use metallic gold leaf adhesive or metallic paint pens to draw bold, sweeping abstract geometric lines across the canvas face.
- Who It Suits Best: Contemporary art lovers, urban loft dwellers, and beginners who want a bold accent piece that coordinates with metallic light fixtures or hardware.
- Styling Tips: Use low-tack painter’s tape to layout crisp, sharp geometric triangles or lightning lines. Burnish the tape edges down firmly with a credit card before painting to guarantee zero color bleeding underneath.
- Benefits: Captures and reflects natural sunlight beautifully throughout the day, creating an ever-changing luxury shimmer in the room.
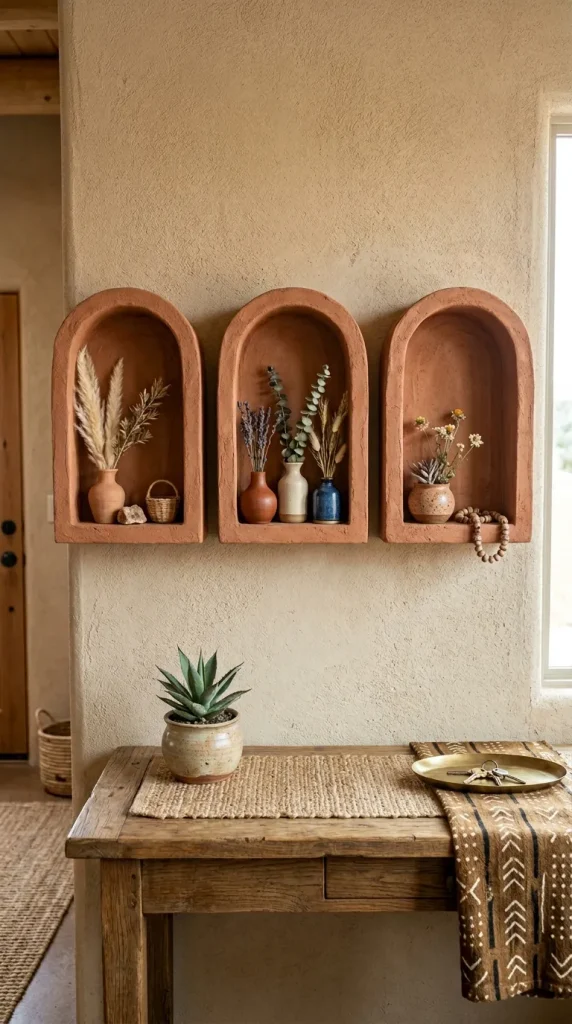
6. The Upcycled Cardboard Archway Shadow Boxes
Using heavy-duty shipping boxes, you can cut and score thin layers of cardboard into architectural recessed archways. When layered with foam tape, sealed with gesso, and painted in warm terra-cotta tones, they look exactly like heavy Mediterranean plaster wall niches.
- Who It Suits Best: Eco-conscious crafters who want to turn cardboard waste into trendy, high-end southwestern or organic modern statement pieces.
- Styling Tips: Mix a spoonful of fine sand or baking soda directly into your matte acrylic paint before coating the structure. This eliminates the smooth paper look and provides a heavy, realistic stone veneer.
- Benefits: Entirely free to source raw materials, extremely lightweight to hang safely with standard mounting strips, and delivers beautiful sculptural shadows.
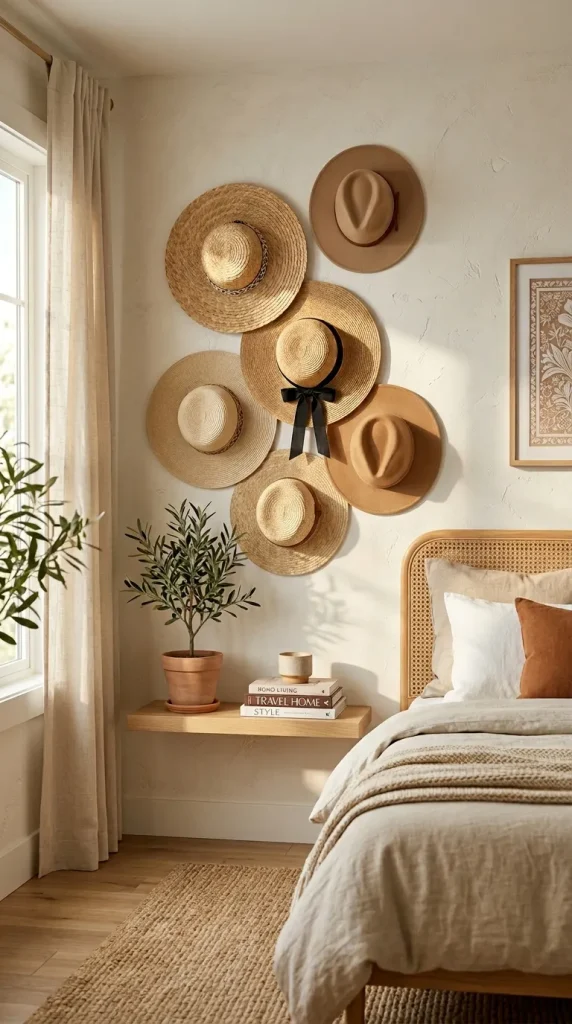
7. The Whimsical Floating Hat Display
If you have a collection of gorgeous wide-brim straw sun hats, felt fedoras, or vintage panamas, stop hiding them away in dark closets! Arrange them gracefully across a blank wall using clear decorative hooks, turning your fashion accessories into a grand, dynamic art installation.
- Who It Suits Best: Fashion lovers, capsule-wardrobe enthusiasts, and those looking to decorate massive master bedroom walls without buying any traditional art supplies.
- Styling Tips: Map out your arrangement on the floor first. Cluster the hats in an odd-numbered overlapping group (groups of 5 or 7 work best) to create a natural, organic visual rhythm on the wall.
- Benefits: Provides instant functional storage that keeps your expensive hats from getting crushed or dusty, while adding massive bohemian dimension to the room.
8. The Modern Fabric Scrap Tapestry Board
Do you have a spectacular remnant piece of high-end vintage fabric, silk scarf, or patterned wallpaper leftover? Stretch the textile tightly across a large foam backing board or insulation panel and secure it with a staple gun for an instant upholstered art frame.
- Who It Suits Best: Textile collectors, antique thrift hunters, and anyone who wants the soft, warm look of an expensive tapestry without complex weaving or sewing.
- Styling Tips: If using a thin fabric like silk or linen, place a sheet of solid white batting underneath the fabric before stretching it over the board to prevent the dark foam backing from shadowing through.
- Benefits: Takes less than twenty minutes to assemble, introduces beautiful graphic textile patterns to the room, and is incredibly easy to re-wrap with new fabric when seasons change.

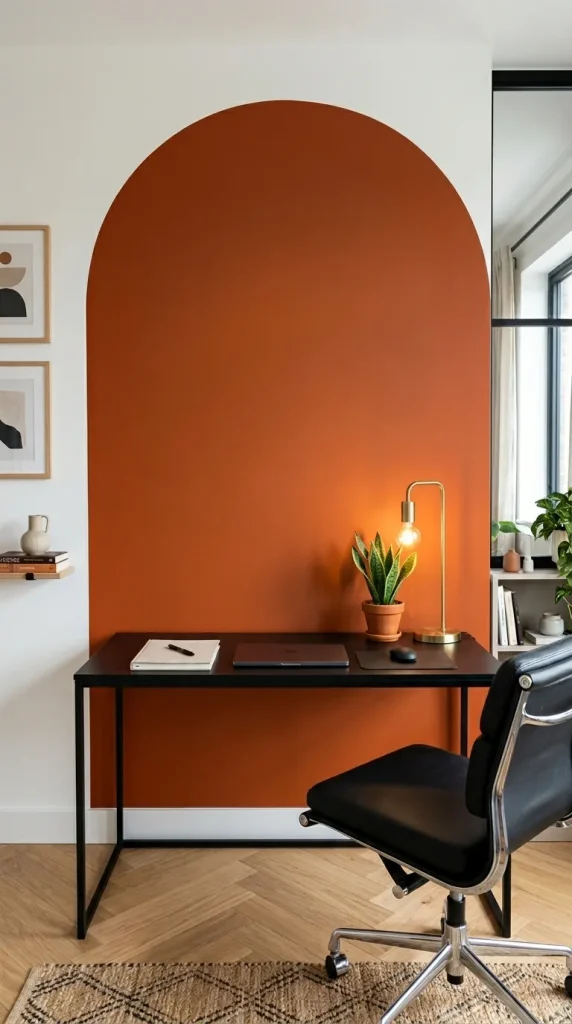
9. The Graphic Painted Color-Block Arch
Sometimes the wall itself is the canvas. By painting a tall, perfectly geometric solid arch directly onto a plain wall using a contrasting accent color, you form a gorgeous architectural zone to frame a bed, desk, or accent chair.
- Who It Suits Best: Bold decorators, renters with painting permissions, and those looking to define specific functional zones in a large open-concept apartment.
- Styling Tips: To get a flawless curved top circle for your arch, pin a string to the center point of your arch width line, tie a pencil to the other end like a giant compass, and smoothly draw your perfect top radius arc before painting.
- Benefits: Requires zero framing or hanging hardware, creates the powerful illusion of higher ceilings, and serves as an anchor for minimalist furniture.
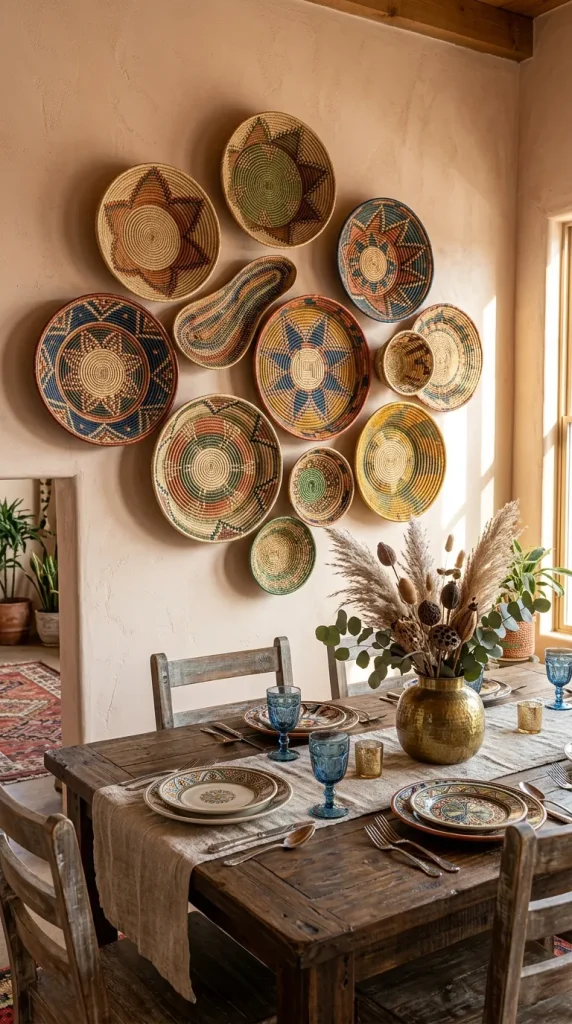
10. The Eclectic Floating Basket Wall Gallery
A favorite in global design circles, this involves gathering an assortment of shallow woven shallow baskets, wicker platters, and seagrass trivets of varying sizes and patterns, mounting them flush against the wall in a sweeping organic cluster.
- Who It Suits Best: World travelers, thrifters, and decorators who want a warm, highly textured global aesthetic in their dining rooms or over kitchen cabinets.
- Styling Tips: Look for baskets with varying weave patterns and dyed accent colors (like blacks, creams, and deep reds). Use simple small finishing nails driven straight through the center weave for a completely invisible mounting hold.
- Benefits: Adds unmatched organic texture and natural warmth to the home, easily expanded over time as you collect new travel souvenirs, and highly durable.
Comparing DIY Wall Decor Project Features
To help you match your available schedule, budget, and tool kit to the perfect room upgrade, use this helpful quick-reference table.
| DIY Wall Decor Idea | Time Investment | Difficulty Level | Style Category | Key Structural Tool |
| Textured Plaster Canvas | 2 Hours | Beginner | Modern / Scandinavian | Notched Trowel & Gesso |
| Floating Yarn Garland | 1 Hour | Absolute Beginner | Bohemian / Cozy | Fabric Shears & Wooden Dowel |
| Pressed Botanical Gallery | 45 Minutes | Beginner | Vintage / Organic | Floating Glass Frames |
| Honeycomb Scrap Shelves | 3 – 4 Hours | Advanced | Geometric / Modern | Miter Saw & Heavy Wood Glue |
| Metallic Graphic Canvas | 1.5 Hours | Beginner | Contemporary / Glam | Painter’s Tape & Leafing Gel |
| Cardboard Shadow Boxes | 3 Hours | Intermediate | Southwestern / Stone | Utility Knife & Baking Soda |
| Floating Hat Display | 20 Minutes | Absolute Beginner | Fashion / Eclectic | Clear Adhesive Wall Hooks |
| Fabric Tapestry Board | 20 Minutes | Absolute Beginner | Classic / Elegant | Heavy Duty Staple Gun |
| Painted Color-Block Arch | 2 – 3 Hours | Intermediate | Minimalist / Bold | String Compass & Trim Brush |
| Basket Wall Gallery | 30 Minutes | Absolute Beginner | Global / Rustic | Small Finishing Nails |
Pro-Tips for Gallery-Quality Wall Installations
Achieving a high-end, professional look with your diy wall decor ideas depends heavily on proper spacing, scale, and secure mounting. Follow these three interior design gold standards to ensure your projects shine.
The 57-Inch Hanging Rule
The single biggest mistake homeowners make is hanging their art way too high on the wall. Professionally staged art pieces should always be hung at human eye level.
- The Blueprint: Measure exactly 57 inches from the floor straight up the wall. This center point is where the true visual middle of your handmade artwork should rest, regardless of whether it is a single heavy canvas or a clustered gallery arrangement.
Always Map Out with Paper Templates
Before driving a single nail or sticking an adhesive strip onto your freshly painted drywall, trace your finished artwork shapes onto cheap craft paper or newspaper and cut them out. Tape these paper templates to the wall using low-tack painter’s tape. Step back to the entrance of the room to review the proportions, spacing, and balance from a distance. Move the paper shapes around until the layout is flawless—this guarantees zero accidental wall damage.
⚠️ Common Wall Decor Mistakes to Avoid
- Using regular glue for heavy canvas art: Standard craft glues or regular school glues will slowly break down when exposed to seasonal home humidity shifts. For anchoring heavy elements like thick plaster or fabric to canvas frames, always use industrial-grade adhesives like construction glue, high-temp hot glue, or professional wood glue to prevent pieces from falling.
- Ignoring Room Proportions and Scale: Hanging a tiny, lone 8×10 canvas over a massive, deep eight-foot sectional sofa looks completely awkward and unbalanced. If your handmade art piece turns out small, balance the visual scale by surrounding it with secondary elements like matching frames, sconces, or floating shelves.
- Hanging Raw, Unsealed Plaster Art: Raw joint compound or heavy plaster can easily absorb humidity from the air, causing it to flake, crack, or chalk white dust all over your furniture. Always seal your finished textured canvas projects with a clear acrylic matte topcoat to lock the structure in permanently.
Frequently Asked Questions (FAQs)
What is the best damage-free way to hang heavy DIY art in a rental property?
If you are renting and cannot drill large holes into the wall studs, rely on heavy-duty hook-and-loop adhesive mounting strips. To ensure they hold securely without falling, always wipe down both the wall surface and the back of your art frame with rubbing alcohol first to remove hidden oils. Press the strips firmly for 30 seconds and let the adhesive cure on the wall for an hour before clicking the artwork into place.
Can joint compound really be used on standard canvas without it cracking?
Yes, but you must avoid applying it too thick in a single layer. If you pile joint compound more than a quarter-inch deep, it will shrink too fast as it dries, leading to ugly spiderweb cracks. For heavy, deep textures, buy flexible modeling paste from an art supply store, or apply your joint compound in two separate, thin layers, letting each dry completely between applications.
How do I clean and dust delicate DIY art pieces like yarn garlands or woven baskets?
Because you cannot throw handmade yarn tapestries or wicker baskets into a standard washing machine, dust accumulation can be a concern. The safest way to clean them is using a standard hairdryer set to the “cool” and “low speed” settings, blowing the dust off gently from a foot away. Alternatively, you can place a clean mesh stocking over your vacuum hose attachment and use the lowest suction setting to gently lift dust away without pulling the threads.
Bring Your Interior Design Dreams to Life
Transforming your living space from cold and empty to rich, vibrant, and personalized is an incredibly rewarding lifestyle upgrade. With these 10 distinct diy wall decor ideas, you have a complete visual toolkit of projects ranging from twenty-minute eco-friendly basket galleries to striking, sophisticated textured plaster canvases.
Stop staring at those boring, blank drywall panels. Grab your painter’s tape, find an inspiring project from our list that matches your personal aesthetic, and start building your custom masterpiece this weekend. Your home is your canvas—go make it beautiful!
Which gorgeous handmade project are you going to create first? Let us know your favorite designs in the comments section below!